

Imagine being able to whip up a batch of coleslaw in less than 5 minutes.
Canned coleslaw makes it possible!
Now, we can’t can coleslaw in its traditional form with mayonnaise, but we can process it in a vinegar brine, and just mix it with mayo when ready to serve. 🙂
Canning Coleslaw Starter: Precautions and Adjustments
If you are new to canning, we recommend that you stick to tested and published recipes.
Though this recipe is tweaked from a tested recipe, it has not been “tested” outside of my home.
When we look at tweaking canning recipes, there are two primary factors to consider:
- Maintaining a safe acidity level
- Maintaining safe density
I’m assured that the acidity level in this recipe is safe because I use a proven safe brine that’s typically used for pickling.
(Also, I always test with pH strips to ensure the acidity is numerically less than 4.6. I recommend that you do so as well. If the acidity is numerically higher than 4.6, it is not safe to water bath.)

Prices pulled from the Amazon Product Advertising API on:
Product prices and availability are accurate as of the date/time indicated and are subject to change. Any price and availability information displayed on [relevant Amazon Site(s), as applicable] at the time of purchase will apply to the purchase of this product.
As for density, there are plenty of tested relish recipes that use the same minced-style chop that I use for this cabbage mixture. That is essentially what we’re making—a relish.
Ingredients for Coleslaw Starter
To make this coleslaw starter, you will need the following ingredients:
- 14 cups of minced cabbage (I use a food processor.)
- 2 large carrots, peeled and shredded
- 1 large onion, chopped
- 1 to 2 sweet bell peppers, chopped
- 2 tablespoons of salt (or about 1/4 cup if doubling the recipe)
- 8 cups of vinegar
- 4 cups of water
- 7 cups of sugar
- 2 tablespoons of mustard seed
- 2 tablespoons of celery seed
Note that this recipe makes around 8 pints of coleslaw starter. The salt is used to draw out the moisture from the vegetables and will be drained and rinsed out later.
Salting and Soaking the Vegetables
I recommend using a food processor to process all of your vegetables into a minced mixture, similar to what you’re used to with coleslaw.
Mix the cabbage, onions, carrots, and bell peppers together and add salt. The salt will draw out the moisture from the vegetables. Place in the fridge to sit for approximately two hours.
After two hours, drain the slaw and rinse it in cold water. Repeat this process in batches if needed. Once the slaw is thoroughly rinsed and drained, it’s time to move on to the next step.
Preparing the Brine and Canner
The next step is to prepare the brine and canner. Here’s how:
- For a single batch of coleslaw starter, you will need 8 cups of vinegar, 4 cups of water, 7 cups of sugar, 2 tablespoons of mustard seed, and 2 tablespoons of celery seed.
- Mix all of the above ingredients in a pot and stir well.
- Place the pot on medium-high heat and bring the mixture to a boil.
- While the brine is heating up, fill your water bath canner halfway with water.
- If you’re using a canner basket, place it in the canner now.
- Clean and warm your jars by placing them in the canner with the water on medium heat.
- Let the jars warm up with the water to avoid temperature shock.
Canning the Coleslaw Starter
Mix the slaw mixture with the brine thoroughly, ensuring that it is all submerged underneath the brine.
Boil the mixture for 10 minutes, then you are ready to fill your jars and can:
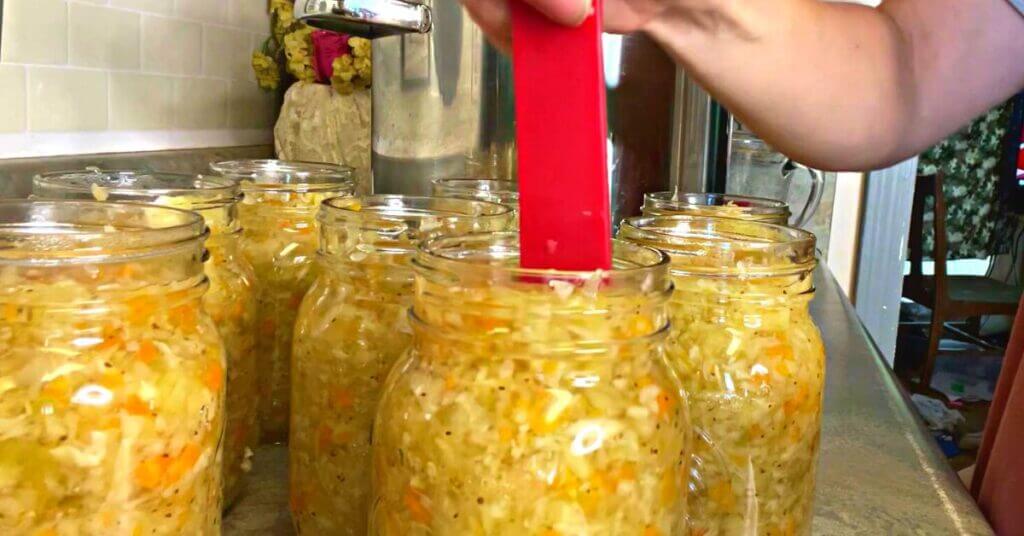
- Ladle the mixture into pint jars, leaving a half-inch headspace. Use a debubbling tool to remove any air bubbles and wipe the rims clean.
- Place new, clean lids on the jars, and screw the rings on finger tight.
- Submerge the jars in the canner under at least an inch of water, and bring the water to a full rolling boil. Process the jars for 10 minutes. Remember to adjust for your elevation if needed.
- Turn off the heat and let the jars sit in the canner for 5 minutes before removing them.
- Remove the jars, and let them sit undisturbed for 12 to 24 hours before using them.
Tips for Using Your Canned Coleslaw
Congratulations on successfully canning your coleslaw relish! Here are some tips on how to use it:
- To make coleslaw, simply drain the vinegar from the canned coleslaw and rinse it under cold water.
- Mix the coleslaw relish with mayonnaise to create a creamy coleslaw dressing.
- Adjust the amount of mayonnaise to your liking, depending on how creamy you want your coleslaw.
- If you like diced apples or raisins in your coleslaw, you can add them now.
- Serve your coleslaw as a side dish with your favorite meals, such as BBQ, grilled meats, sandwiches, or burgers.
- Store any leftover coleslaw in the refrigerator for up to 3-4 days.
Remember, this recipe is not a tested, published recipe. If you are brand new to canning, it’s best to stick to tested and proven-safe recipes.
If you’re experienced—and know how to test your pH levels—this coleslaw relish is a great addition to your canning repertoire. Enjoy!
Print
Easy Canned Coleslaw
This canned coleslaw starter is processed in a vinegar brine. When ready to serve, just drain, rinse, and mix with mayo!
- Total Time: 2 hours 20 minutes
- Yield: 8 pints 1x
Ingredients
- 14 cups of minced cabbage (I use a food processor.)
- 2 large carrots, peeled and shredded
- 1 large onion, chopped
- 1 to 2 sweet bell peppers, chopped
- 2 tablespoons of salt (or about 1/4 cup if doubling the recipe)
- 8 cups of vinegar
- 4 cups of water
- 7 cups of sugar
- 2 tablespoons of mustard seed
- 2 tablespoons of celery seed
Instructions
- Use a food processor to process all of your vegetables into a minced mixture, similar to what you're used to with coleslaw.
- Mix the cabbage, onions, carrots, and bell peppers together and add salt. Mix well. Place in the fridge to sit for approximately two hours.
- After two hours, drain the slaw and rinse it in cold water, and rinse well.
- Prepare the brine by bringing the vinegar, water, sugar, and spices to a boil.
- Add the veggie mixture, and boil for 10 minutes.
- Ladle the mixture into pint jars, leaving a half-inch headspace. Use a debubbling tool to remove any air bubbles and wipe the rims clean.
- Place new, clean lids on the jars, and screw the rings on finger tight.
- Submerge the jars in a canner under at least an inch of water, and bring the water to a full rolling boil. Process the jars for 10 minutes. Remember to adjust for your elevation.
- Remove jars from canner, and let them sit undisturbed for 12 to 24 hours before checking your seals and storing.
- Prep Time: 2 hours
- Canner Processing Time: 10 minutes
- Cook Time: 10 minutes


Do you use white vinegar or can you use other vinegars such as apple cider vinegar in your coleslaw relish as long as the vinegar is 5% acidity?
I use white vinegar, but apple cider vinegar would work as well as long as it’s 5% acidity, like you said. 🙂
Have you ever tried using less sugar?
No, but you can. The acidity is taken care of by the vinegar brine, so less sugar isn’t a problem.
How many pounds of cabbage to make this. I need to order the cabbage. Thanks
I don’t have an exact weight, but it takes about two medium-sized heads of cabbage to get the 14 cups of minced cabbage.
I’d roughly estimate the cabbage heads to weight 2 lbs or so.
Can you use the bagged slaw they sell in the store?
I’ve never tried it, so I’m not sure how it would turn out.
I wondered if you think I could use the Pineapple Zucchini recipe using Chayote Squash. It is a little bit more firm. I was given quite a few and I would love to try it.
Thanks
I’m not familiar with chayote squash, so I’m not comfortable advising either way. Wish I could be of more help!