

Mmm. Strawberry jam is one of our top 3 favorite flavors.
I don’t know why it took me so long to can our own strawberry jam, but this recipe was worth the wait!
Next time, I think I’ll use less sugar. The addition of lemon juice is enough to acidify it appropriately, so we can “afford’ to use less sugar, if preferred.
Bear in mind, however, that pectin needs sugar in order to set properly, so I would only decrease the sugar amount by 1-2 cups.
Why You Will LOVE This Simple Strawberry Jam Recipe
If you’re looking for a simple and easy strawberry jam recipe that only requires a few ingredients, you’ve come to the right place!
This recipe is perfect for anyone who wants to make their own strawberry jam at home. Here are some reasons why you’ll love this recipe:
- It only requires five cups of crushed strawberries, a quarter cup of lemon juice, four tablespoons of pectin, and five cups of sugar.
- The recipe is simple and easy to follow, even for beginners.
- The Hoosier Hill Farm pectin used in this recipe ensures that your jam will set properly, so you won’t end up with syrup instead of jam.
- The recipe yields four pints of jam for every batch of five cups of fruit pulp, so you can make as much or as little as you need.
- Simple canning means you can enjoy the fresh taste of summer strawberries year round.
Importance of Ratio in Jam Making
When making jam or jelly, it’s important to maintain a specific ratio between fruit pulp, sugar, and pectin. If these ratios are off, you may end up with syrup instead of jam.
With other canning recipes, we can double or triple it to achieve the amount of jars we want. However, we can’t do that with jam or jelly.
Using this recipe, for every five cups of fruit pulp, you will end up with about four pints of jam.
If you want more, you’ll need to prepare and process each batch separately. Thankfully, the process goes relatively fast compared to other canning projects, so it’s not a big deal. 🙂
Strawberry Jam Preparation
To prepare your strawberry jam, crush enough strawberries to achieve five cups of crushed berries.
I use a food processor and pulse the strawberries two to three times, leaving some good-sized chunks. After crushing the strawberries, you need to add a quarter cup of lemon juice and stir well.
The next step is to gradually add four tablespoons of pectin. That just means to add one tablespoon at a time, and stir it well before adding the next tablespoon.
I recommend Hoosier Hill Farm pectin for the best results:
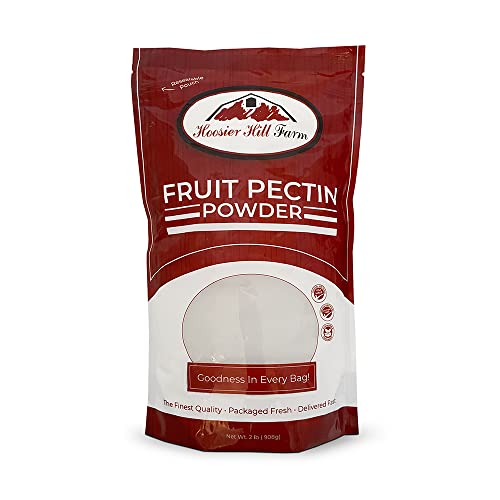
- Used to make cooked jams and jellies.
- Provides the jelly-like consistency to jams, jellies, and marmalades
- Buy in bulk and save.
- Hoosier Hill Farm Brand. Your satisfaction is d.
- 2 lb bag Hoosier Hill fruit pec
Prices pulled from the Amazon Product Advertising API on:
Product prices and availability are accurate as of the date/time indicated and are subject to change. Any price and availability information displayed on [relevant Amazon Site(s), as applicable] at the time of purchase will apply to the purchase of this product.
Once the pectin is added, bring the mixture to a rolling boil and switch to a whisk. Add five cups of sugar and stir until it comes to a hard rolling boil.
Set a timer for one minute and stir the mixture constantly during that minute.
After one minute, remove the mixture from the heat and skim off as much foam as possible.
At this point, you’re ready to can.
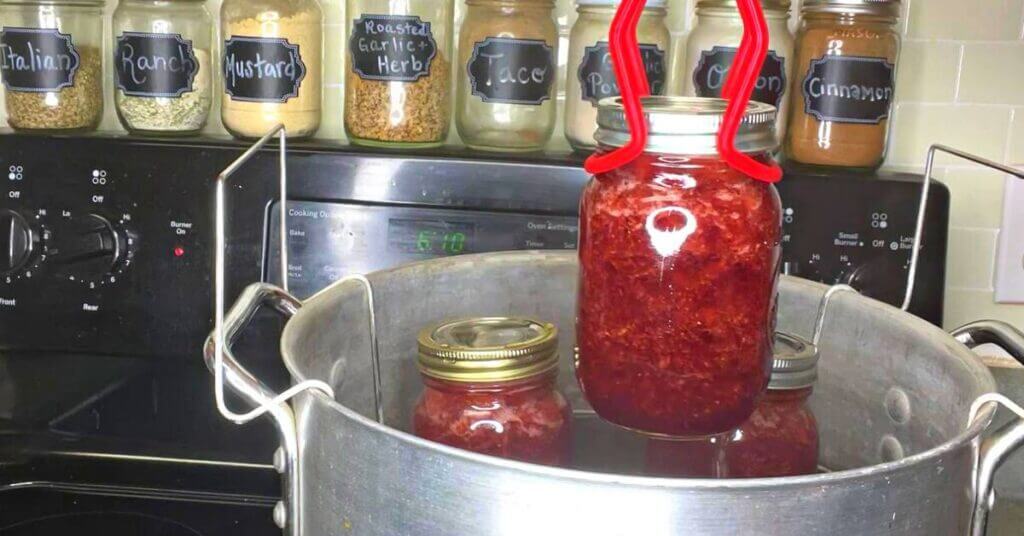
Canning Strawberry Jam
- Fill each jar to a quarter inch headspace. Debubble.
- Wipe the rims of the jars and put on new and clean lids and rings.
- Submerge the jars underneath at least an inch of water in a canner. Bring to a hard rolling boil. Once boiling, process the jars for 10 minutes. Remember to adjust for your elevation.
- After processing, remove the jars and let them sit undisturbed for 12-24 hours. The jam will thicken up during the cool-down process. It may up to 24 hours to see the end product’s true consistency.
Enjoy your homemade strawberry jam on toast, biscuits, oatmeal, yogurt, PB&Js, and more!
Want to make preserves instead? Here’s how strawberry preserves differ from jam.
Does Strawberry Jam Have to Be Water Bath Canned?
When it comes to jam, the question of whether or not it needs to be water bath canned is sometimes debated.
If we want to practice safe canning according modern testing, then yes, we need to water bath can our jams and jellies to make them shelf stable.
Water bath canning is a process that involves submerging jars of food in boiling water for a specific amount of time. This process helps to kill any bacteria or other harmful microorganisms that may be present in the food, and also creates a vacuum seal that helps to preserve the food for longer periods of time.
By water bath canning your strawberry jam, you can help to prevent the growth of harmful bacteria and ensure that your jam stays safe to eat for years.
Print
Homemade Strawberry Jam for Canning
This simple strawberry jam recipes calls for just a few ingredients, and the canning instructions are easy, too!
- Total Time: 5 minutes
- Yield: 4 pints 1x
Ingredients
- 5 cups crushed strawberries
- 1/4 cup lemon juice
- 4 Tbs pectin
- 5 cups sugar
Instructions
- Crush enough strawberries to yield 5 cups. (I use a food processor and just pulse a few times.)
- Transfer crushed strawberries to a large stockpot. Add 1/4 cup of lemon juice and stir well.
- Next, add 1 Tbs pectin at a time and stir until you've added 4 Tbs total.
- Bring the mixture to a rolling boil. Add 5 cups sugar and stir until it comes to a hard rolling boil.
- Set a timer for one minute, and stir the mixture constantly during that minute.
- After one minute, remove the mixture from the heat and skim off as much foam as possible.
- Following canning instructions in the post above, and process in a water bath for 10 minutes. Remember to adjust for your elevation if needed.
- Prep Time: 10 minutes
- Canning Time: 10 minutes
- Cook Time: 5 minutes


Before boiling or simmering a Jam or Jelly, add 1 tbsp of butter to mixture to lessen the amount of foam to skim off surface. You save 1-2 cups of fruit juice which otherwise would have became foam.
Do you add the butter in the beginning or after the sugar
Just made 2 batches from homegrown strawberries the little extra tasted delicious and was setting up perfect.