

Now that you’re preserving your own food, you’ll need a place to put all that home canned goodness.
Finding the optimal space for canning jar storage—especially when we’re talking about a year-or-more’s worth of jars—isn’t always easy.
You’ll need to get creative, especially if you have limited space in your house already.
Best Way to Store Canning Jars
Before we get into specific ways for storing home canned food, let’s talk about what to keep in mind when you’re planning your storage options.
First and foremost, the place you store your jars should be optimized for long-term storage. To keep contents safe and delicious, consider the following 5 factors:
- Climate Control: The storage spot you select should never allow your jars to freeze or peak above normal room temperature. 50-70 degrees Fahrenheit is recommended for most canned food storage. Be aware of microclimates in your house. Make sure you’re not building shelves next to a furnace or appliance that directs excessive heat onto your canned goods.
- Space to Rotate Properly: There should be sufficient space to allow for first in, first out (FIFO) inventory control, just like in the big box stores. Plan for space to move your jars around, even when your larder is fully stocked. If the space itself won’t allow this, make sure your storage pantry is next to an area where you can place jars temporarily while rotating stock.
- Strong and Durable: The storage method you choose should be sturdy enough to keep your jars protected from damage. Avoid stacking jars. If there’s no way to include shelving between layers, then lay something on top of the lower row that will distribute the weight from the layer above. Be aware of overloading any one shelf—full jars are heavy.
- Keep It Dark: Light causes food to discolor over time. Try to store your canning jars in an area with no windows, or use a room-darkening curtain. That said, it’s perfectly find to turn a light while working in your canning pantry.
- Avoid Excessive Moisture: Dampness can cause corrosion. If your storage area is in a damp basement (or similar environment), you may want to use a dehumidifier.
DIY Canning Jar Storage Shelf: Video Tutorial
These were all factors I considered when searching for the perfect space to build my own canning jar shelves.
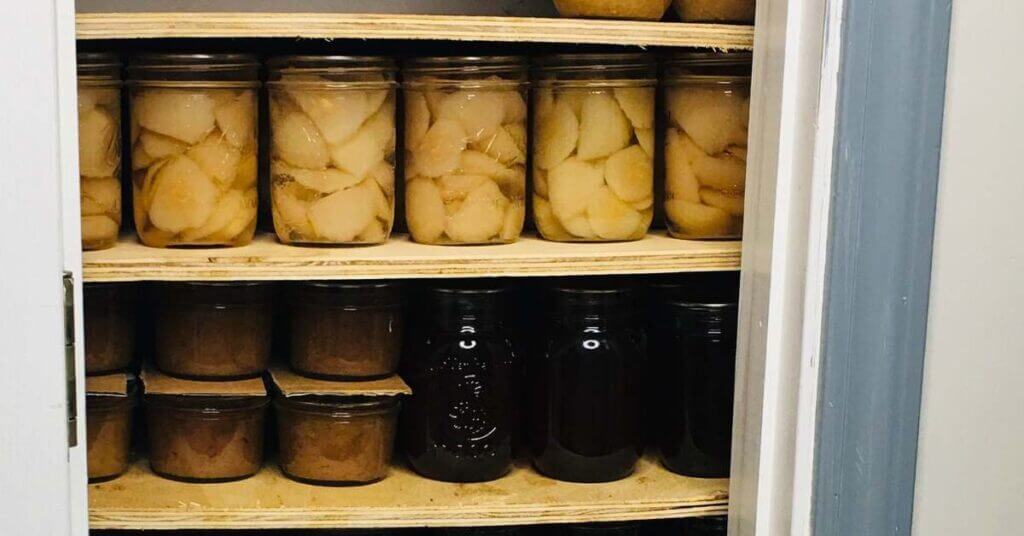
As a result, I decided to repurpose a tiny, underutilized closet in the main area of my house as a storage area for many of my canned goods.
It’s climate-controlled, there’s a space right outside of it where I can safely place older jars as I rotate in new jars, and it stays dark with the door shut.
The original closet wasn’t appropriately configured to store the jars without stacking, but I solved that problem with sturdy custom shelving I added. Check out the video below to see the whole process!
Materials
To safely store my canned goods, I screwed shelf supports directly into studs. I chose 2x4s we already owned, but 1x2s would have worked as well.
My shelves aren’t very wide, so I didn’t need to support them in the middle or across the back. For the shelves themselves, I used ½-inch plywood cut to fit the inside width of the closet.
To build something similar, you’ll want to take into account the size of the jars you’re storing and the dimensions of your closet to figure out how much wood you’ll need.
I measured the height of quart jars and pint jars, since that’s what I plan to store in my closet, then I added a little space above to provide convenient access.
Be sure to leave enough room when measuring to account for the thickness of the shelf!
Once you have your measurements, figure out how many shelves you can build to determine the amount of lumber needed.
You’ll also need screws long enough to go through your chosen shelf supports and drywall then into the studs to make the support secure.
Tool-wise, power tools certainly made this project easier. I used a drill with a screwdriver bit to drive the screws through the supports.
Prices pulled from the Amazon Product Advertising API on:
Product prices and availability are accurate as of the date/time indicated and are subject to change. Any price and availability information displayed on [relevant Amazon Site(s), as applicable] at the time of purchase will apply to the purchase of this product.
We cut the shelving down with a power saw (a table saw is ideal, but a circular saw is sufficient).
Other than basic building tools, such as a tape measure, a straight edge, and a level, there aren’t many other tools you’ll need for this simple project!
Assembling the Storage Shelves
I looked into purchasing a canning jar storage rack, but assembling my own alternative was more cost effective and just as simple as buying one and putting it together.
Basically, I started at the bottom of the closet and began marking the sides for the supports.
Start at whatever height you choose. I originally hoped to store larger buckets on the floor but decided to go with jars to maximize storage space.
I measured and marked the height of each row—according to jar size—on the walls. Then I installed each row of supports, followed by the shelf.
I actually goofed and screwed in all the supports first before realizing I needed to alternate between supports and shelving.
So, you get to learn from my mistake and save a little time…. You’re welcome!
I own my home, so I can modify it as I see fit. And I’m fortunate enough to have access to power tools and the ability and know-how to use them.
But what if you’re a renter or don’t own/can’t use tools that make the process go smoothly?
In other words, what if you don’t want to build your own canning shelf? Let’s look at a few other canning jar storage ideas.
A Canning Jar Cabinet
A great Mason jar food storage option for renters (or those who don’t want to deal with a DIY project) is a standalone cabinet.
You can even repurpose an armoire or china hutch.
The top of the cabinet can hold your canning pots and equipment, and the inside of the doors are a great place to hang extra lids and rings.
Canning Jar Storage Boxes
Plastic
Another useful storage method is plastic Mason jar containers like these Jelly Jar SafeCrates.
They are especially handy if you ever need to transport your jars. They’re perfect for camping or even to take on vacation.
Cardboard
Another canning jar organizer we like is this set of three boxes that safely separate your jars:

Prices pulled from the Amazon Product Advertising API on:
Product prices and availability are accurate as of the date/time indicated and are subject to change. Any price and availability information displayed on [relevant Amazon Site(s), as applicable] at the time of purchase will apply to the purchase of this product.
Using something like this to store your jars will let you tuck them away here and there. You can stack them easily in a corner or on top of cabinets or squeeze into various places in your house.
Stackable Milk Crates
Stackable milk crates, especially the older-style ones that are super sturdy, protect your jars really well.
They’re great for quart jars!

Prices pulled from the Amazon Product Advertising API on:
Product prices and availability are accurate as of the date/time indicated and are subject to change. Any price and availability information displayed on [relevant Amazon Site(s), as applicable] at the time of purchase will apply to the purchase of this product.
Watch yard sales and flea markets for the old-style ones that can hold a lot of weight. The newer, less sturdy milk crates work well for empty jar storage.
What About Empty Canning Jar Storage?
Speaking of empty jars…
Where do you store jars as you empty them or new ones you’ve bought for the next season?
I store empty canning jars upside down in the original boxes they came in, then stack them in a safe place.
If you already disposed of those, another excellent way to store empties is to simply put them back where the full jar once stood.
Sure, you’ll probably still have to find places for spare empty jars, but this method will mean less empties to find spots for.
In a pinch, use can even use regular shipping boxes and add towels (or some type of padding) between the jars.
Always wash jars and rings before storing them.
FREE FOOD STORAGE PLAN!
Does gathering and storing a year’s worth of food for your family seem overwhelming and unachievable?
Make it easy with our step-by-step plan. Subscribe to our weekly newsletter & we’ll send it to you FREE!
[fluentform id=”5″]
Frequently Asked Questions
How do you store canning jar lids and rings?
Rings, or bands, should be removed from your jars about 12-24 hours after they leave the canner.
A wonderful way to store bands is to string them on a wire hung inside your storage area or with your canning equipment. I actually use bungee cords like these:
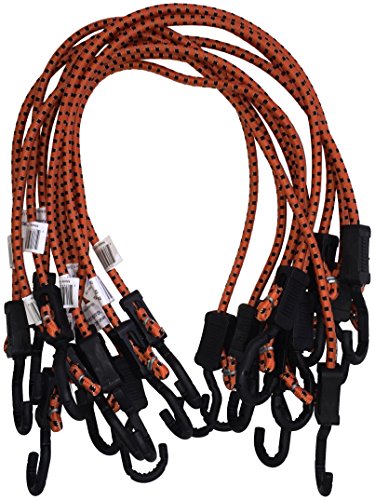
Prices pulled from the Amazon Product Advertising API on:
Product prices and availability are accurate as of the date/time indicated and are subject to change. Any price and availability information displayed on [relevant Amazon Site(s), as applicable] at the time of purchase will apply to the purchase of this product.
You can also put them in a basket or lidded tote.
Can Mason jars be stored outside?
While empty Mason jars can be stored outside—assuming they’re protected from getting knocked over and damaged—full jars should not be.
They need insulation from the environment—and even a mild climate includes rain. Jars stored under an outside roof, such as a carport, will still be subjected to humidity when it rains.
Is it OK to stack home canned jars?
It’s not advisable to stack jars without at least a board or heavy cardboard between the layers to distribute the weight evenly.
Otherwise, the seals can break, or other calamities (such as knocking over a stack) can happen. Plus it’s extremely inconvenient when you need something on a bottom row!
Whether you’re a DIYer or someone who likes ready-made solutions, creating canning jar storage can be tricky and take a little work.
However, when you’re enjoying home-canned August tomatoes on a dreary day in January, you’ll be glad you made the effort!


You should probably clarify that while you can stack empty jars safely, you should never stack full jars due to “false seals”.
That should have said “the potential for false seals”