Oh, canned green beans.
For years we had a love-hate relationship.
The crisp snap of a fresh green bean is delightful, so it’s a tad sad to lose that during the canning process.
But, now that we’ve discovered a family-favorite Spanish rice skillet and a way to make canned beans a bit crispy, they are back on our pantry shelf for good.
If you want to learn how to can green beans yourself, here’s an easy-to-follow tutorial.
Preparing Green Beans for Canning
Selecting and Picking Fresh Green Beans
When canning green beans, it’s important to choose fresh green beans from your garden or local market. Look for beans that are firm, crisp, and uniform in size.
To harvest green beans from your garden, pick the beans when they are about 2-3 inches long and have a vibrant green color. The beans should snap easily when bent, which indicates their freshness.
You can choose to pick them flat or wait until the beans inside have plumped up, depending on your preference.
Washing and Snapping Off Ends
We need to start with squeaky clean beans. Begin by placing them in a large bowl filled with cold water.
Gently swish the beans around with your hands, then drain and repeat until the water is clear and the beans are free of dirt and debris.
After washing the beans, place them on a clean towel and pat them dry.
Next, snap off the ends of each green bean by holding the bean at one end and bending the other end downwards until it breaks. This will remove any tough stems and ensure a better final product.
(I heard recently that doing this on the porch with Grandma was the original “snap chat.”)
You can also use a knife to trim the ends if you prefer a more uniform appearance. Now, cut or break the beans into 1-inch pieces for easier packing and a more consistent result in your canned green beans.
Rather Watch Than Read? Video Tutorial:

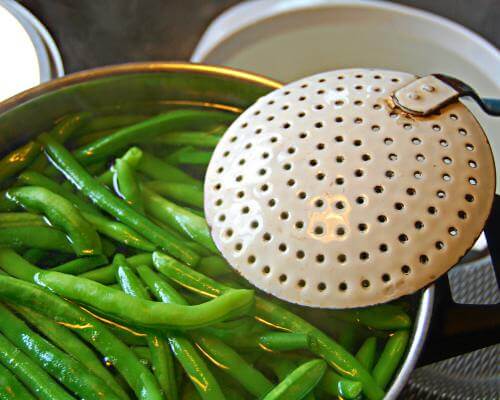
Blanching Green Beans
Blanching is an essential step in the canning process. It helps preserve the beans’ color, texture, and flavor while removing any bacteria or enzymes that could spoil your canned green beans.
- Fill a large pot or kettle with enough water to cover the green beans and bring to a boil.
- Place your prepared green beans in the boiling water and cook them for about 5 minutes.
- While the beans cook, prepare a large bowl full of ice water.
- After the beans have cooked, use a slotted spoon to transfer them from the boiling water to the ice water, stopping the cooking process and setting their vibrant green color.
- Finally, drain the beans and pat them dry, preparing them for the canning process.
Canning Supplies and Equipment
You’ll want to gather the necessary supplies and equipment beforehand to help the process flow better. You don’t want to be searching your kitchen for essential items as you move through the canning process.
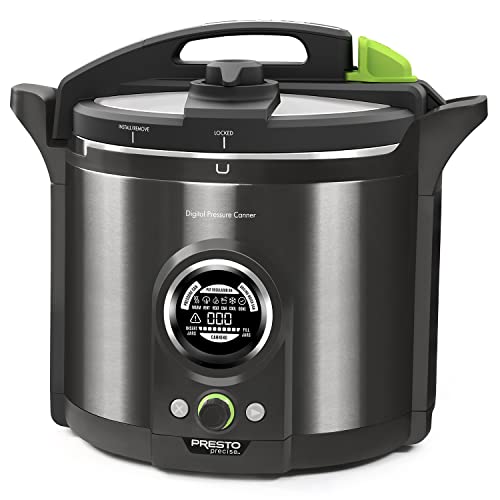
First, you’ll need a pressure canner to safely process your green beans.
Prices pulled from the Amazon Product Advertising API on:
Product prices and availability are accurate as of the date/time indicated and are subject to change. Any price and availability information displayed on [relevant Amazon Site(s), as applicable] at the time of purchase will apply to the purchase of this product.
Unlike water bath canning, which is suitable for higher acidity foods like fruits, pressure canning is essential for low-acidity veggies like green beans.
A pressure canner ensures that the beans are heated to the right temperature to prevent spoilage and keep them safe for consumption.
Next, prepare your canning jars. You can use either quart jars or pints, depending on your preference. Ensure you have clean, unblemished lids with new seals and accompanying rings for your jars.
You’ll also want canning funnel. The funnel will help reduce spillage and mess as you fill your jars.

Prices pulled from the Amazon Product Advertising API on:
Product prices and availability are accurate as of the date/time indicated and are subject to change. Any price and availability information displayed on [relevant Amazon Site(s), as applicable] at the time of purchase will apply to the purchase of this product.
When your jars are filled, you’ll need a jar lifter to safely place them into the pressure canner and remove them after processing. These specially designed tools allow you to handle hot jars with ease, minimizing the risk of burns or injury.
Finally, depending on the type of pressure canner you use, you may need a weighted gauge for your canning process. This will help to ensure that your pressure canner maintains the correct pressure throughout the canning process.
If you have the Presto Digital Pressure Canner, you will not need a gauge.
Preparing Your Canning Jars
Before you begin canning green beans, it’s essential to properly prepare your canning jars for the process.
First, clean your jars thoroughly using hot, soapy water. Make sure to scrub the inside and outside of each jar, paying special attention to the threads and sealing edges.
Rinse the jars with hot water to remove any soap residue.
While cleaning your jars, you will also need to prepare your lids and rings. Place the lids and rings in a pot of simmering water to help sanitize them. Keep them in the water until you’re ready to use them, but avoid boiling to prevent damage to the seals.
(Heating lids and rings is now considered optional, so it’s not an absolute must-do if you don’t have the time or space on your stovetop.)
Next, get your jars preheating. This helps prevent breakage due to thermal shock when you fill them with boiling water.
You can achieve this two ways:
- Place your clean jars on a rack in a large pot and fill the pot with enough water so that it covers the jars by at least 1 inch. Bring the water to a gentle simmer, and keep the jars hot until you’re ready to fill them.
- Or, when you clean your jars, use the dishwasher (preferably with heat dry)—and leave them in the dishwasher to stay warm.
Lastly, before we actually start canning, get your stove and workspace ready for canning.
Clear off any clutter, and have all necessary equipment and ingredients within easy reach. Have all of your tools clean and, if possible, your sink clear. (You’ll want a quick space to drop dirty tools!)
A well-prepared workspace will make the canning experience more enjoyable and efficient.
Packing Green Beans into Jars
Though salt is optional, it sure enhances the flavor. For every quart jar, add 1 teaspoon of canning salt. For pints, add a 1/2 teaspoon.
Raw Pack and Hot Pack Methods
There are two methods for canning green beans: raw pack and hot pack. Each method has its own set of steps.
Raw Pack:
- Tightly pack the raw beans into the sterilized jars, leaving an inch of headspace at the top.
- Add canning salt if you’re using it. (Canning salt just means straight salt with no iodine or anti-caking agents.)
- Fill the jars with boiling water, leaving 1-inch headspace. Remove air bubbles by running a spatula or debubble tool around the inside edge of the jar.
- Wipe the jar rims with a clean, wet towel, then put on lids and bands.
Hot Pack:
- Place the prepared beans in a large pot, add just enough water to cover them, and bring to a boil. Cook for about 5 minutes.
- Carefully remove the beans using a slotted spoon and place them into clean, hot jars, leaving 1-inch headspace.
- Add the canning salt (1 teaspoon per quart) if using.
- Ladle the hot cooking liquid over the beans, again leaving 1-inch headspace. Remove any air bubbles.
- Wipe the jar rims, place the lids, and screw the bands.
Now they’re ready to go into the canner!
The Canning Process
Regardless of your elevation, pints of green beans need to process for 20 minutes, while quarts need to process for 25 minutes.
The canner pressure (PSI) for canning green beans varies depending on your altitude, as it affects the internal pressure of the canner.
This chart is specifically for canning quarts of green beans:
| Altitude | Dial Gauge | Weighted Gauge |
|---|---|---|
| 0-1,000ft | 11 lb | 10 lb |
| 1,001-2,000ft | 11 lb | 15 lb |
| 2,001-4,000 ft | 12 lb | 15 lb |
| 4,001-6,000 ft | 13 lb | 15 lb |
| 6,000+ ft | 14 lb | 15 lb |
Using a Pressure Canner
To use your pressure canner, follow the manufacturer’s instructions for your specific model.
In general, you’ll need to place the filled jars on the canner’s rack, add a few inches of water, and seal the canner.
Turn up the heat to build pressure inside the canner, and keep a close eye on the dial gauge or weighted gauge to ensure it reaches the right pressure for your altitude.
Once the canner reaches the appropriate pressure, start your timer, and adjust the heat as needed to maintain the required pressure. *It’s very important that you do not start timing until the canner comes to pressure.
After the processing time is complete, turn off the heat and let the pressure canner cool before removing the jars. Allow the jars to cool on a towel or a wire rack, undisturbed, for 12-24 hours.
If you’re using the Presto Digital Pressure Canner, this process happens automatically as the machine has a built-in way to monitor pressure. It will beep to let you when it’s time to move to the next step:
Prices pulled from the Amazon Product Advertising API on:
Product prices and availability are accurate as of the date/time indicated and are subject to change. Any price and availability information displayed on [relevant Amazon Site(s), as applicable] at the time of purchase will apply to the purchase of this product.
Checking Seals and Cooling Jars
After processing the green beans in a pressure canner, it’s important to let them cool properly.
1. Wait for the jars to cool: Once the processing is complete, turn off the heat and let the canner cool naturally. Carefully remove the jars with a jar lifter. Avoid tilting them. Place them on a towel or solid surface, making sure they are not touching each other. Allow the jars to sit and cool for 12-24 hours.
2. Check the seal: After the cooling period, gently press the center of each jar’s lid. If the lid is firm and does not move up or down, the jar has sealed properly. If the lid is flexible or makes a clicking sound when pressed, the jar did not seal. If you catch it within 24 hours, you can either reprocess the jar or store it in the refrigerator & consume within 3 days.
3. Wipe and label the jars: Clean the outside of the jars to remove any residue. Use a damp cloth, then dry the jars completely. Label each jar with the contents and the date of canning.
4. Store in a cool, dark place: Keep your canned green beans in a cool, dark location. Ideally, the storage area should have a consistent temperature between 50-70°F (10-21°C) and should be free from direct sunlight or humidity.
When it comes to shelf life, home-canned green beans can last for years. However, it’s always best to inspect your jars before consuming the contents.
If you notice any signs of spoilage—such as bulging lids, foul odors, or discoloration— discard the jar immediately.
FREE FOOD STORAGE PLAN!
Does gathering and storing a year’s worth of food for your family seem overwhelming and unachievable?
Make it easy with our step-by-step plan. Subscribe to our weekly newsletter & we’ll send it to you FREE!
Frequently Asked Questions
Can I can green beans without a pressure canner?
No, green beans must be pressure canned. Pressure canners are designed to reach higher temperatures that are necessary for canning low-acid foods like green beans safely.
There are pickled green beans—sometimes called dilly beans—that are water bath canned due to the added vinegar for acidity.
How long should I pressure can green beans?
It depends on the size of the jars and your elevation. For pint-sized jars, process raw or hot packed green beans at 10 pounds of pressure for 20 minutes if you’re using a weighted-gauge canner, or 11 pounds of pressure for 20 minutes if you’re using a dial-gauge canner.
For quart-sized jars, process raw or hot packed green beans at 10 pounds of pressure for 25 minutes with a weighted-gauge canner, or 11 pounds of pressure for 25 minutes with a dial-gauge canner.
You will need to add more processing time if you live 1000 feet or more above sea level. Always refer to your canner’s manual for specific instructions.
Is it possible to can green beans with bacon?
Bacon is a high-fat meat, and canning it may introduce excess grease, which can prevent proper sealing. As such, there are no tested recipes for canning green beans with bacon.