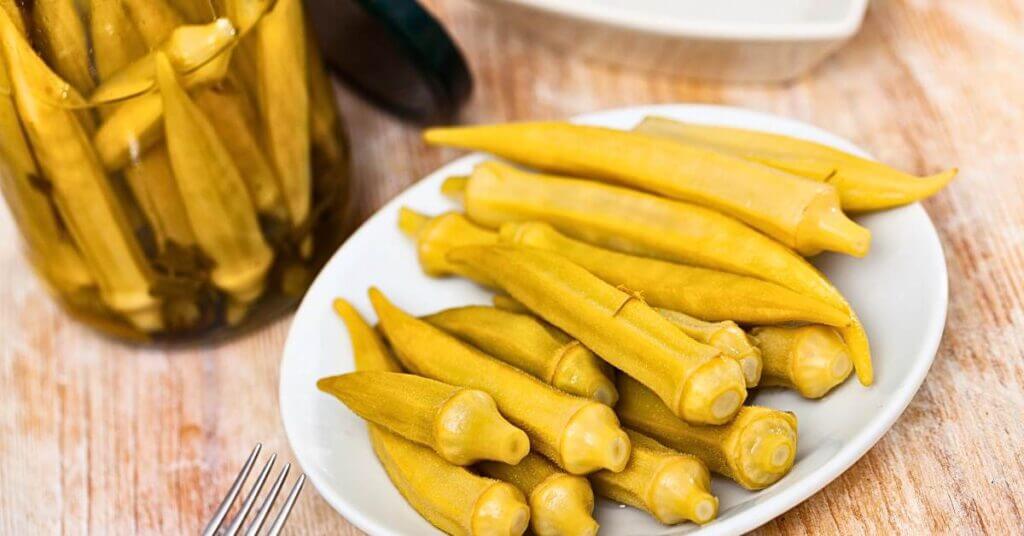
Pickled okra is a delightful, tangy treat that can be enjoyed as a snack, appetizer, or a unique addition to your favorite dishes.
Its crisp texture and zesty flavor make it a perfect complement to sandwiches, salads, and charcuterie boards.
Plus, making your own pickled okra at home is surprisingly simple!
In this post, we’ll guide you through an easy pickled okra recipe that’s sure to become a staple in your pantry.
Ingredients
- 1 pound fresh okra, washed and trimmed
- 2 cups white vinegar
- 2 cups water
- 1/4 cup canning salt or kosher salt
- 2 tablespoons sugar
- 4 cloves garlic, peeled
- 2 teaspoons dill seeds
- 2 teaspoons mustard seeds
- 1 teaspoon peppercorns
- 1 teaspoon red pepper flakes (optional, for a spicy kick)
- 4 sprigs fresh dill
- 4 pint-sized canning jars with lids and bands
Can with Confidence!
What if you could enjoy year-round, rock-bottom prices on produce? Canning is the key!
Learn how to can safely in our self-paced, online Canning 101 Master Class!
Steps to Make Pickled Okra
- Prepare the Jars: Sterilize the canning jars and lids by boiling them in water for 10 minutes. Keep the jars hot until you’re ready to fill them.
- Prepare the Okra: Wash the okra thoroughly and trim the stems, leaving the caps intact. Make sure to select young, tender okra for the best results.
- Make the Brine: In a large pot, combine the vinegar, water, salt, and sugar. Bring the mixture to a boil, stirring to dissolve the salt and sugar. Once dissolved, remove the pot from heat.
- Pack the Jars: Place one garlic clove, 1/2 teaspoon of dill seeds, 1/2 teaspoon of mustard seeds, 1/4 teaspoon of peppercorns, and a pinch of red pepper flakes (if using) into each sterilized jar. Add a sprig of fresh dill. Pack the okra into the jars, standing them upright.
- Add the Brine: Pour the hot brine over the okra in each jar, leaving about 1/2 inch of headspace at the top. Use a non-metallic utensil to remove any air bubbles, and adjust the headspace if necessary.
- Seal the Jars: Wipe the rims of the jars with a clean, damp cloth to ensure a good seal. Place the lids on the jars and screw on the bands until they are fingertip tight.
- Process the Jars: Place the filled jars into a canning pot with a rack and cover with water by at least 1 inch. Bring the water to a boil and process the jars for 10 minutes. Adjust the processing time if you live at a high altitude.
- Cool and Store: Carefully remove the jars from the water using a jar lifter or tongs and place them on a clean kitchen towel. Let the jars cool undisturbed for 12-24 hours. Check the seals by pressing the center of each lid—if it doesn’t pop back, the jar is sealed. Store the sealed jars in a cool, dark place. Unsealed jars should be refrigerated and used within a few weeks.

Prices pulled from the Amazon Product Advertising API on:
Product prices and availability are accurate as of the date/time indicated and are subject to change. Any price and availability information displayed on [relevant Amazon Site(s), as applicable] at the time of purchase will apply to the purchase of this product.
How Long Before You Can Eat Pickled Okra?
You should wait at least 2 weeks before eating pickled okra.
This allows the flavors to fully develop and the okra to absorb the brine.
For the best taste and texture, let the jars sit in a cool, dark place for this period before opening them.
Is Pickled Okra Still Slimy Like Fresh Okra?
No, pickled okra is generally not slimy like fresh okra.
The acidity in the pickling brine helps to reduce the slime, resulting in a crisp and tangy texture.
This makes pickled okra a great alternative for those who enjoy the flavor of okra but are not fond of its natural sliminess.
With this easy recipe, you can enjoy the crisp, tangy taste of pickled okra any time of the year.
Whether you’re adding it to your favorite dishes or snacking straight from the jar, homemade pickled okra is sure to become a household favorite.
Print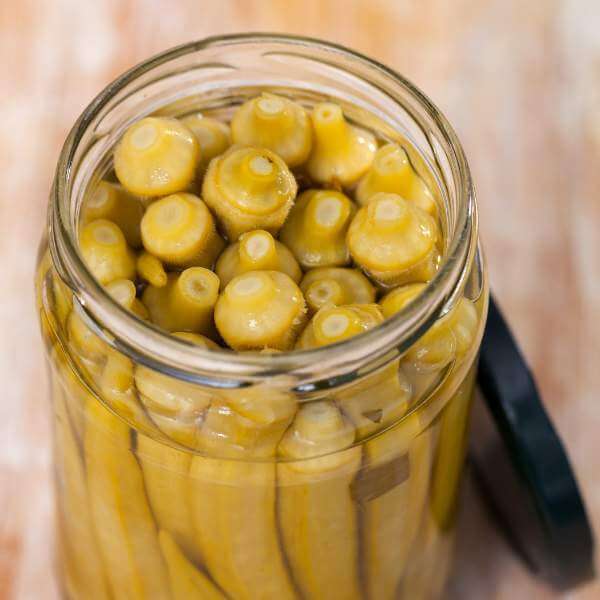
Easy Pickled Okra
This easy pickled okra recipe yields crisp, tangy, and flavorful okra perfect for snacking or adding to your favorite dishes. The pickling process eliminates the natural sliminess of fresh okra, making it a delightful addition to your pantry.
- Total Time: 45 minutes
- Yield: 4 pints 1x
Ingredients
- 1 pound fresh okra, washed and trimmed
- 2 cups white vinegar
- 2 cups water
- 1/4 cup canning salt or kosher salt
- 2 tablespoons sugar
- 4 cloves garlic, peeled
- 2 teaspoons dill seeds
- 2 teaspoons mustard seeds
- 1 teaspoon peppercorns
- 1 teaspoon red pepper flakes (optional, for a spicy kick)
- 4 sprigs fresh dill
- 4 pint-sized canning jars with lids and bands
Instructions
-
Sterilize the canning jars and lids by boiling them in water for 10 minutes. Keep the jars hot until you’re ready to fill them.
-
Wash the okra thoroughly and trim the stems, leaving the caps intact. Make sure to select young, tender okra for the best results.
-
In a large pot, combine the vinegar, water, salt, and sugar. Bring the mixture to a boil, stirring to dissolve the salt and sugar. Once dissolved, remove the pot from heat.
-
Place one garlic clove, 1/2 teaspoon of dill seeds, 1/2 teaspoon of mustard seeds, 1/4 teaspoon of peppercorns, and a pinch of red pepper flakes (if using) into each sterilized jar. Add a sprig of fresh dill. Pack the okra into the jars, standing them upright.
-
Pour the hot brine over the okra in each jar, leaving about 1/2 inch of headspace at the top. Use a non-metallic utensil to remove any air bubbles, and adjust the headspace if necessary.
-
Wipe the rims of the jars with a clean, damp cloth to ensure a good seal. Place the lids on the jars and screw on the bands until they are fingertip tight.
-
Place the filled jars into a canning pot with a rack and cover with water by at least 1 inch. Bring the water to a boil and process the jars for 10 minutes. Adjust the processing time if you live at a high altitude.
-
Carefully remove the jars from the water using a jar lifter or tongs and place them on a clean kitchen towel. Let the jars cool undisturbed for 12-24 hours. Check the seals by pressing the center of each lid—if it doesn’t pop back, the jar is sealed. Store the sealed jars in a cool, dark place. Unsealed jars should be refrigerated and used within a few weeks.
- Prep Time: 35 minutes
- Canning Time: 10 minutes