Are you ready to add a zesty, crunchy twist to your pantry?
Making and canning dilly beans is the perfect way to capture the fresh flavors of summer and enjoy them all year long.
These tangy, garlicky pickled beans are not only easy to make but also incredibly satisfying to crunch on.
In this guide, we’ll show you how to transform simple green beans into a jar of pure pickled goodness, perfect for snacking, garnishing, or gifting.
What Are Dilly Beans?
“Dilly beans” are a type of pickled green bean, known for their crisp texture and tangy, dill-infused flavor.
They are typically made by preserving fresh green beans in a brine solution that includes vinegar, salt, garlic, dill, and often spices like red pepper flakes and mustard seeds.
They can be enjoyed as a snack, added to salads, or served alongside sandwiches and charcuterie boards.
The process of making and canning dilly beans not only extends the shelf life of fresh green beans but also enhances their flavor, making them a delightful addition to any pantry.
Ingredients for Dilly Beans
To make a batch of dilly beans, you’ll need the following ingredients:
- 2 pounds of fresh green beans, washed and trimmed
- 4 cups of water
- 4 cups of white vinegar
- 1/4 cup of pickling salt
- 1 tablespoon of sugar
- 4 cloves of garlic, peeled
- 8 sprigs of fresh dill
- 2 teaspoons of red pepper flakes (optional, for a spicy kick)
- 1 teaspoon of mustard seeds
- 1 teaspoon of black peppercorns

Prices pulled from the Amazon Product Advertising API on:
Product prices and availability are accurate as of the date/time indicated and are subject to change. Any price and availability information displayed on [relevant Amazon Site(s), as applicable] at the time of purchase will apply to the purchase of this product.
How to Make Pickled Dilly Beans
In a large pot, combine the water, white vinegar, pickling salt, and sugar.
Bring the mixture to a boil, stirring until the salt and sugar dissolve. Reduce the heat and keep the brine hot.
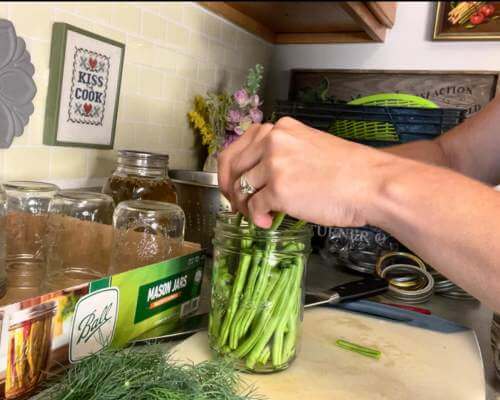
Trim the ends of the green beans so they fit into the jars with about 1/2 inch of headspace at the top.
Now for the spices. Place one clove of garlic, 2 sprigs of dill, 1/2 teaspoon of mustard seeds, 1/2 teaspoon of black peppercorns, and a pinch of red pepper flakes (if using) into each jar.
Tightly pack the green beans vertically into the jars, leaving 1/2 inch of headspace at the top.
Using a funnel, carefully ladle the hot brine over the beans in each jar, leaving 1/2 inch of headspace.
If you don’t want to can your beans, you can stop here, and simply place the dilly beans in the refrigerator and enjoy within a few weeks.
Or, you can make them shelf-stable via canning….
GET THE BOOK!
Food Prep Guide: A Plan for Money-Saving, Self-Sustaining Abundance in Hard Times is a book of strategies & tutorials that help you build a long-term pantry that sustains your family on a budget—even in the midst of rising food costs.
Canning Instructions
Here’s the equipment you’ll need:
- 4 pint-sized canning jars with lids and bands
- Large pot for boiling water
- Canning rack or a towel to line the bottom of the pot
- Tongs
- Funnel
- Ladle
- Measuring cups and spoons

Prices pulled from the Amazon Product Advertising API on:
Product prices and availability are accurate as of the date/time indicated and are subject to change. Any price and availability information displayed on [relevant Amazon Site(s), as applicable] at the time of purchase will apply to the purchase of this product.
Wash the canning jars, lids, and bands in hot, soapy water. Rinse well. Keep the jars hot until ready to use.
Simmer the lids and bands in hot water (not boiling) to soften the sealing compound.
After your jars are full of beans and brine as instructed above, run a non-metallic utensil (like a plastic knife or a bubble remover) around the inside of the jars to release any trapped air bubbles.
Adjust the headspace if necessary by adding more brine to maintain 1/2 inch of headspace.
Wipe the rims of the jars with a clean, damp cloth to remove any brine residue, then place the lids on the jars and screw the bands on until fingertip-tight.
Place a canning rack in the bottom of a large pot. Fill the pot with enough water to cover the jars by at least 1 inch. Bring the water to a boil.
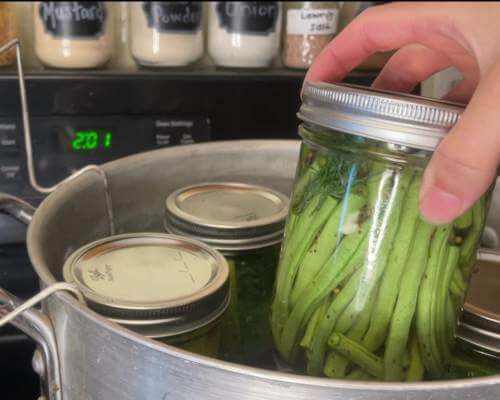
Using tongs, carefully lower your already warmed jars into the boiling water. Process the jars for 10 minutes.
Adjust the processing time if you are 1000 feet or more above elevation (refer to this canning chart for specifics).
After processing, carefully remove the jars from the water bath and place them on a towel-lined counter. Allow the jars to cool undisturbed for 12-24 hours.
After the jars have cooled, check the seals by pressing down on the center of each lid. If it doesn’t pop back, the jar is sealed properly. Any unsealed jars should be refrigerated and consumed within a few weeks.
Tasty Ways to Use Dilly Beans
Besides snacking straight from the jar, these pickled green beans have plenty of delicious uses:
- Salad Add-In: Chop dilly beans and add them to salads for a burst of flavor and texture. They pair well with leafy greens, tomatoes, cucumbers, and feta cheese.
- Charcuterie Board Feature: Include dilly beans on a charcuterie board alongside cheeses, meats, olives, and crackers. Their vibrant color and tangy taste complement a variety of other flavors.
- Pickle Relish Substitute: Chop dilly beans finely and use them as a substitute for traditional pickle relish in recipes like potato salad, tuna salad, or deviled eggs.
- Burgers and Hot Dogs: Add a few dilly beans to your burgers or hot dogs for an unexpected and delicious twist. They provide a crunchy, tangy contrast to the savory meats.
- Taco Topping: Slice dilly beans and use them as a topping for tacos or burritos. Their unique flavor adds a refreshing element to Mexican-inspired dishes.
- Pasta Salad Ingredient: Incorporate dilly beans into cold pasta salads. Their tangy taste pairs well with ingredients like cherry tomatoes, olives, and Italian dressing.
- Stir-Fry Addition: Add chopped dilly beans to stir-fries for a tangy twist. They can be added at the end of cooking to retain their crispness and vibrant flavor.
Experiment with these ideas, and discover new ways to enjoy your homemade dilly beans.
And there you have it—your very own batch of delicious dilly beans! Not only have you created a tasty treat, but you’ve also preserved the flavors of summer to enjoy all year round.
The best part? Sharing your homemade dilly beans with family and friends!
Print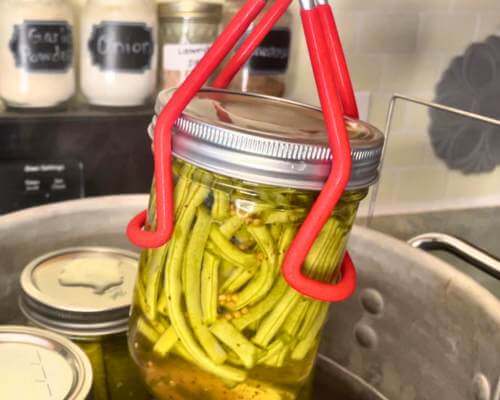
Pickled Dilly Beans
These delicious dilly beans offer a tangy and crunchy pickled green bean that’s perfect for snacking, salads, and garnishes. This step-by-step guide ensures you’ll have flavorful dilly beans to enjoy year-round.
- Total Time: 30 minutes
- Yield: 4 pints 1x
Ingredients
- 2 pounds of fresh green beans, washed and trimmed
- 4 cups of water
- 4 cups of white vinegar
- 1/4 cup of pickling salt
- 1 tablespoon of sugar
- 4 cloves of garlic, peeled
- 8 sprigs of fresh dill
- 2 teaspoons of red pepper flakes (optional, for a spicy kick)
- 1 teaspoon of mustard seeds
- 1 teaspoon of black peppercorns
Instructions
- Wash the canning jars, lids, and bands in hot, soapy water. Rinse well. Keep the jars hot until ready to use. Simmer the lids and bands in hot water (not boiling) to soften the sealing compound.
- In a large pot, combine the water, white vinegar, pickling salt, and sugar. Bring the mixture to a boil, stirring until the salt and sugar dissolve. Reduce the heat and keep the brine hot.
- Trim the ends of the green beans so they fit into the jars with about 1/2 inch of headspace at the top.
- Place one clove of garlic, 2 sprigs of dill, 1/2 teaspoon of mustard seeds, 1/2 teaspoon of black peppercorns, and a pinch of red pepper flakes (if using) into each jar.
- Tightly pack the green beans vertically into the jars, leaving 1/2 inch of headspace at the top.
- Using a funnel, carefully ladle the hot brine over the beans in each jar, leaving 1/2 inch of headspace.
- Run a non-metallic utensil (like a plastic knife or a bubble remover) around the inside of the jars to release any trapped air bubbles. Adjust the headspace if necessary by adding more brine.
- Wipe the rims of the jars with a clean, damp cloth to remove any brine residue.
- Place the lids on the jars and screw the bands on until fingertip-tight.
- Place a canning rack in the bottom of a large pot. Fill the pot with enough water to cover the jars by at least 1 inch. Bring the water to a boil.
- Using tongs, carefully lower the jars into the boiling water. Process the jars for 10 minutes. Adjust the processing time if you are at a high altitude above 1000 feet.
- After processing, carefully remove the jars from the water bath and place them on a towel-lined counter. Allow the jars to cool undisturbed for 12-24 hours.
- After the jars have cooled, check the seals by pressing down on the center of each lid. If it doesn’t pop back, the jar is sealed properly. Any unsealed jars should be refrigerated and consumed within a few weeks.
- Label the jars with the date and contents. Store the sealed jars in a cool, dark place. Let the dilly beans sit for at least two weeks to develop their full flavor before enjoying.
- Prep Time: 20 minutes
- Canning Time: 10 minutes