

Let’s be honest—I used to toss carrot tops to the chickens without a second thought.
Those peach peels? Straight to the compost. Onion tops? Gone.
Cabbage outer leaves? You guessed it—chicken feed.
But then I had one of those lightbulb moments. What if those “scraps” weren’t actually scraps at all? What if they were ingredients I just didn’t know how to use yet?
Three years ago, I started experimenting with zero-waste preservation techniques, and y’all, it completely changed how I look at food.
We’re talking about turning the parts you’d normally discard into pantry staples that people pay pretty good money for at the grocery store.
Today I’m sharing five techniques that have saved us hundreds of dollars and turned our kitchen waste into nutritional powerhouses.
If you want to maximize your garden harvest or stretch those summer produce deals, these methods will transform how you think about food.
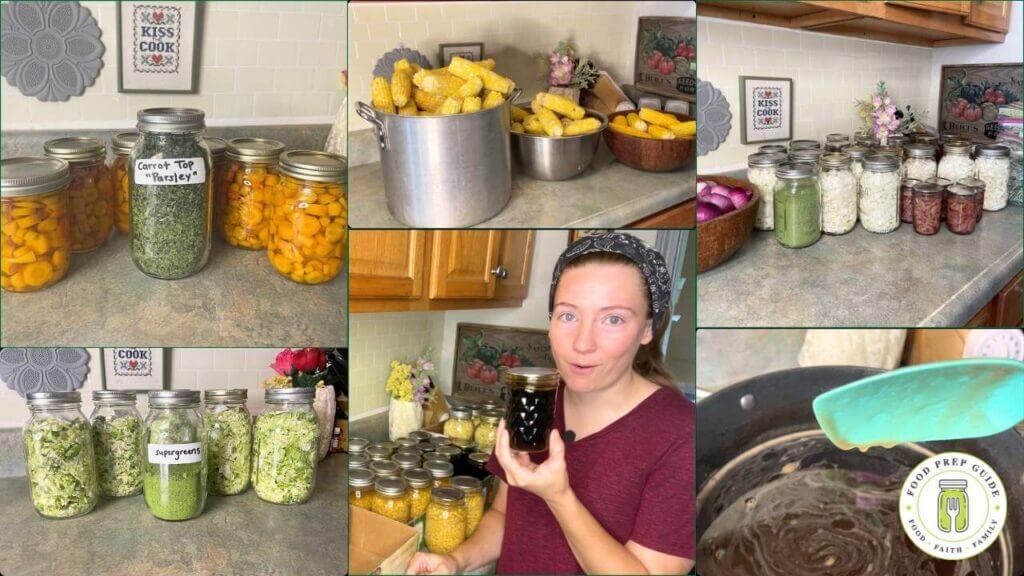
1. Turn Carrot Tops Into “Free” Parsley
Raise your hand if you’ve ever thrown away carrot tops because you thought they weren’t edible.
Guilty as charged! But here’s what I discovered: carrot tops taste remarkably similar to parsley with just a slightly more earthy flavor. And the nutrition? Often better than the carrots themselves—packed with vitamin K, vitamin C, and potassium.
Here’s how to preserve them:
Start with bright green, fresh-looking tops (not yellow or wilted). Give them a really good wash—they hold onto dirt just like any leafy green. I actually wash them twice and run them through my salad spinner because they can get pretty gritty.
Remove any tough, woody stems (those are the bitter ones), but tender stems are fine to include. Spread the leaves on dehydrator trays with plenty of space for air circulation. If they’re too bunched up, some pieces dry while others stay damp.
Dehydrate at 125-130°F for about 6 hours until completely crispy. Crumble them up and store in vacuum-sealed mason jars.
The result? A concentrated herb that most people can’t tell apart from dried parsley. I use it in soups, stews, herb blends, and even mixed into olive oil for bread dipping. It’s completely free if you’re already buying carrots with tops or growing your own.
Pro tip: I make an all-purpose garden blend by mixing dried carrot tops with oregano, thyme, and garlic powder. It’s fantastic on roasted vegetables.
GET THE BOOK!
Food Prep Guide: A Plan for Money-Saving, Self-Sustaining Abundance in Hard Times is a book of strategies & tutorials that help you build a long-term pantry that sustains your family on a budget—even in the midst of rising food costs.
2. Make Incredible Fruit Butter From Peels
This technique might be my absolute favorite because it feels like straight-up kitchen magic.
I’m talking about making rich, spreadable fruit butter from just the skins—peach, apple, pear, even plum peels. Each one has its own unique character, but the process is exactly the same.
The process:
Collect about 5 cups of fruit skins (you can freeze them as you go if you’re doing this over several days—they actually break down better from frozen). Toss everything into a crockpot with:
- 1-2 cups sugar
- 1 tablespoon lemon juice
- 1 teaspoon vanilla extract
- 1 teaspoon ground cinnamon
- 1/2 teaspoon pumpkin pie spice
- Splash of water (about 1/4 cup)
Cook on low for 4-6 hours until everything breaks down. The house smells absolutely incredible during this process. Once softened, run an immersion blender through it until smooth.
What you get: Gorgeous, concentrated fruit butter that costs pennies to make and tastes better than anything store-bought. I use it on toast, stirred into oatmeal, swirled into yogurt, even as a glaze for pork chops.
For different fruits, I customize the spices—vanilla and cardamom for pear peels, extra cinnamon for apple peels. You can water bath can it for 15 minutes if you want shelf-stable storage.

3. Create Onion Powder From Green Tops
We grow around 100 pounds of onions each year, and I used to cut off those green tops and toss them straight to the animals. Talk about wasted opportunity!
Those tops are essentially free onion flavoring—milder than the bulb but with lovely, recognizable onion flavor. When dehydrated, they become a seasoning somewhere between onion powder and chives.
The method:
Cut tops about an inch above where the bulb starts to swell. Wash really well, then chop into 1-inch pieces for even drying. Spread on dehydrator trays (no overlapping) and run for about 8 hours at 125-130°F until completely crispy.
Grind in a high-speed blender, spice grinder, or coffee grinder until you get a fine powder. Clean your equipment really well afterward—that onion flavor is surprisingly strong and will transfer to whatever you grind next.
Uses: Salad dressings, soup blends, seasoning mixes, compound butter, or mixed into sour cream for quick onion dip. Store vacuum-sealed in mason jars and it lasts until the next harvest.
4. Make Super Greens Powder From “Tough” Leaves
This technique makes me feel like I’ve cracked some secret code. For years, I was throwing away the most nutritious parts of plants without even thinking about it.
Those tough outer cabbage leaves? The ones that protect the inner leaves from sun and weather? They’re incredibly rich in vitamins and minerals—significantly higher levels of vitamin K, vitamin C, folate, and antioxidants compared to the pale inner leaves we usually eat.
What works: Outer cabbage leaves, beet greens, broccoli leaves, kale stems, radish tops, turnip greens, collard green stems—basically any green that’s too tough to eat fresh but nutritionally worthwhile.
The process:
Wash really well and remove damaged parts. With cabbage, I sometimes remove the thick central rib if it’s super fibrous. Cut into 2-3 inch sections with kitchen shears.
Dehydrate at 125-130°F for 8-10 hours (these take longer because they’re thick and fibrous). Once bone dry, grind in a high-speed blender until you get the finest powder possible.
The result: A gorgeous green powder packed with vitamins, minerals, and fiber. I add half a tablespoon to smoothies, stir it into soups, mix into salad dressings, even add it to homemade pasta for green noodles.
It’s basically a homemade superfood supplement that would cost $20+ at health food stores, but you know exactly what’s in it.
5. Extract Sweet Gold: How to Make Corn Cob Syrup
This technique completely changed how I think about corn season.
Instead of tossing those stripped cobs into the compost, I discovered they’re hiding liquid gold that tastes remarkably like pancake syrup.
Those seemingly spent corn cobs still contain concentrated corn flavor that transforms into a genuine pancake syrup substitute.
The taste is so close to commercial pancake syrup that your family won’t know the difference.
The simple process:
Start by placing your corn cobs in a large pot and add enough water to cover them completely. Bring to a rolling boil and let it boil hard for 30 minutes straight, keeping the lid on throughout the process.
After 30 minutes, reduce heat to a simmer and let it cook for another full hour. This long, slow extraction is what pulls all that corn flavor from the cobs.
Remove the spent cobs (your chickens will love these water-soaked treats, or they can go to compost). Strain the corn juice through cheesecloth, a nut milk bag, or a fine strainer lined with paper towels to get a clear liquid.
Return the strained juice to your pot and bring back to a boil. Add sugar in equal parts to your juice – if you have 7 cups of corn juice, add 7 cups of sugar. You can use slightly less sugar if you prefer a thinner consistency.
Boil this mixture until it reduces to half its original volume and reaches 220°F on a candy thermometer.
This usually takes about an hour of hard boiling.
What you get: A golden syrup that tastes like genuine pancake syrup with that familiar corn sweetness.
It’s perfect for pancakes, waffles, and anywhere you’d use regular syrup.
Pour into hot canning jars with ½-inch headspace, wipe rims clean (syrup is sticky!), and process in a water bath or steam canner for 10 minutes, adjusting for your elevation. The syrup will look thin when hot but thickens beautifully as it cools.
The Bigger Picture
What I love most about these techniques is how they’ve changed my relationship with food.
I see potential everywhere now, and our grocery budget goes so much further because we’re using absolutely everything


If you don’t buy a large quantity of peaches (I’m cooking for one), a good way to deal with the peels is to dry them then grind them up with sugar. It makes a great topping for toast of muffins.
Also, if you are peeling tomatoes to process, I preferred to roast them, remove the skins, then roast the peels further. I would dry them between paper towels in the micorwave. The dry peels would be ground up with salt. The result is an extremely flavorful seasoned salt, good on any savory dish.
I grew a couple brussel sprout plant this year. Not only did I harvest the brussel sprouts but I also harvested the leaves. I have some in the freezer to cook like spinach, but I also used some instead of cabbage to make sprout rolls. The first ones I cooked made the rolls so delicious. I also froze enough so far for two more side dishes to other meals.
I still have enough sprouts and leaves on my plants to probably do a few more dishes.
I will be looking for a way to use the stems as well or maybe I will leave them in the garden to see what they will do next year.