Two gallons of fresh blueberries sitting on your counter can feel overwhelming—especially when you know they won’t last long.
But here’s the thing: those berries represent an investment.
Whether you picked them yourself at a local farm or snagged them on sale at the grocery store, you want every single one to count toward feeding your family well.
After years of preserving hundreds of jars annually, I’ve learned that blueberries are one of the most versatile fruits to put up.
From quick freezing methods that take minutes to homemade fruit leather that rivals store-bought versions, there’s a preservation method for every skill level and every use you can imagine.
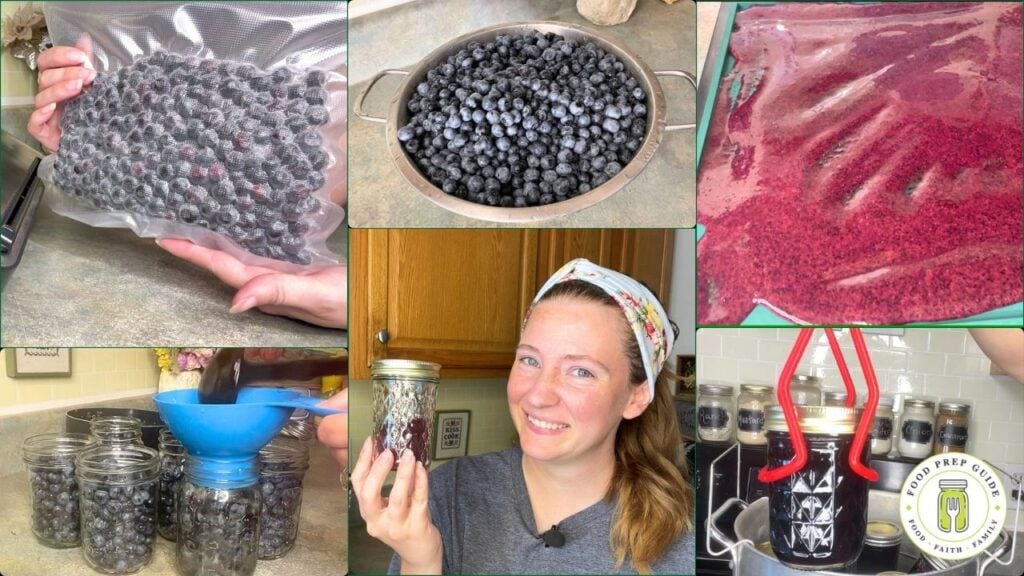
Today I’m walking you through seven different ways to preserve blueberries—all tested in my own kitchen with my own family’s taste buds in mind.
Some take minutes, others require a bit more time, but all of them will help you make the most of your blueberry haul.
1. Flash Freeze for Perfect Individual Berries
This is hands-down the easiest method, and it’s perfect if you want berries that won’t clump together in one giant frozen mass.
All you need is a baking sheet and some freezer space. Wash your berries and spread them in a single layer on a baking sheet—no doubling up. Pop that tray in the freezer overnight.
The next morning, you’ll have individually frozen berries that you can vacuum seal in flat bags. This makes them stackable and prevents freezer burn way better than just tossing them in a regular freezer bag.
Pro tip: Cut your vacuum seal bags longer than you think you need. That way you can cut, use what you need, and reseal the bag multiple times without wasting bags.
2. Blueberry Powder for Flavor Without Texture
This one’s a game-changer if you want blueberry flavor in things like pancakes, yogurt, or cookies without the actual berry pieces.
Blend your blueberries with just enough water to get things moving in your blender—don’t overthink the measurements. Spread the puree on dehydrator trays with raised-edge silicone mats (trust me, you need those raised edges or your puree will run right off).
Set your dehydrator to 125°F and let it go until the leather is brittle with no sticky spots. A little glistening is normal because of the natural sugars.
Break up the pieces and grind them in a dry blender container, coffee grinder, or spice grinder until you have a fine powder. This stuff is incredible in oatmeal, and I’ve made some amazing blueberry cookies with it.
Store in vacuum-sealed jars and it’ll last about a year—though it never lasts that long around here.

3. Homemade Fruit Roll-Ups (Better Than Store-Bought)
Your kids will think you’re magic when you pull these out.
Puree your blueberries with honey (or whatever sweetener you prefer—sugar, agave, even monk fruit works). Spread on dehydrator trays with liners and dehydrate at 125°F overnight.

Prices pulled from the Amazon Product Advertising API on:
Product prices and availability are accurate as of the date/time indicated and are subject to change. Any price and availability information displayed on [relevant Amazon Site(s), as applicable] at the time of purchase will apply to the purchase of this product.
The finished product will be pliable and slightly sticky—that’s exactly how fruit leather should be. Don’t second-guess yourself thinking it’s underdone.
These make perfect lunch box treats and you know exactly what’s in them.
4. Blueberry Pie Filling (With My Safety-First Modifications)
Let me be upfront: I do deviate from the standard tested recipes here, but I’ve done my research to ensure it’s still safe. If you’re brand new to canning, stick to tested recipes until you get experience under your belt.
For the filling base, you’ll need:
- 4¾ cups water
- 2¼ cups sugar
- ½ cup arrowroot powder (I use this instead of clear gel)
- ½ teaspoon salt
- ½ tablespoon lemon juice
- A splash of vanilla extract
I prefer arrowroot powder because we’ve eliminated modified cornstarch from our diet. Mix everything together and bring to a boil, stirring constantly so it doesn’t stick.
Fill jars with fresh blueberries to 1-inch headspace (pie fillings are notorious for siphoning, so that extra space is crucial). Pour the hot filling over the berries, leaving that same 1-inch headspace.
Process in a water bath canner for 30 minutes, adjusting for your elevation.
Fair warning: Some jars will boil over. It happens. If a jar loses too much liquid or gets too messy, just pop it straight in the fridge and use it first.
Can with Confidence!
What if you could enjoy year-round, rock-bottom prices on produce? Canning is the key!
Learn how to can safely in our self-paced, online Canning 101 Master Class!
5. Blueberry Jam with Pumpkin Pie Spice
This isn’t your grandmother’s plain blueberry jam. The pumpkin pie spice transforms the flavor completely.
Start with 2½ quarts of blueberries, crushed to your preferred consistency—I like mine chunky. Add:
- 10 tablespoons pectin
- 1 tablespoon lemon juice
- 1 teaspoon pumpkin pie spice
- Splash of vanilla
Bring to a hard rolling boil, then add 10 cups of sugar. Yes, that sounds like a lot, but that’s what makes the pectin set properly. Boil hard for exactly 1 minute, stirring constantly.
Fill jars to ¼-inch headspace and process for 10 minutes in a water bath canner.
Try this blueberry jam recipe without pectin!
6. Blueberry Syrup from Scratch
This starts with cooking down 3 quarts of blueberries with 2 cups of water. Simmer for 12 minutes, then strain through cheesecloth or a nut milk bag to separate the juice from the pulp.
Don’t throw away that pulp—save it for blueberry butter!
For the syrup, combine the strained juice with 5 cups sugar and 2 cups water. Boil for 20 minutes uncovered, then add 3 tablespoons lemon juice. Return to a boil, simmer 5 minutes, and skim off any foam.
Process in jars for 10 minutes.
Check out the complete tutorial here.
7. Blueberry Butter from Leftover Pulp
This is where that pulp from the syrup project gets a second life.
Run 5½ cups of pulp through your food processor until smooth. Mix with:
- 3 cups sugar
- 1 tablespoon fresh lemon zest
- 1½ tablespoons lemon juice
- ¼ teaspoon nutmeg (or pumpkin pie spice)
Bring to a boil, then simmer for 1 hour, stirring every few minutes. Fill quarter-pint jars (perfect for spreading on biscuits) and process for 10 minutes.
Making the Most of Your Investment
What I love about these methods is that you can use every single berry. Nothing gets wasted, and you end up with a pantry full of options for breakfast, snacks, and desserts.
Some of these projects can be done simultaneously—make syrup and butter together, or freeze some berries while you’re waiting for jam to process. It’s all about working efficiently with the time you have.
Whether you picked your own berries or found a great deal at the store, these preservation methods ensure your investment keeps paying dividends all year long.
From quick weekday breakfasts with that blueberry powder to special occasion desserts with homemade pie filling, you’ll be amazed how far those two gallons can stretch.
Ready to get started? Pick the method that sounds most doable for your schedule and dive in.
Your future self will thank you when you’re pulling homemade blueberry syrup off the shelf in January!