Have you ever found yourself scrambling for a thoughtful gift at the last minute? Raise your hand if you’ve been there!
With Christmas around the corner, I wanted to share one of my favorite homemade gifts that looks beautiful, serves a practical purpose, and costs very little to make.
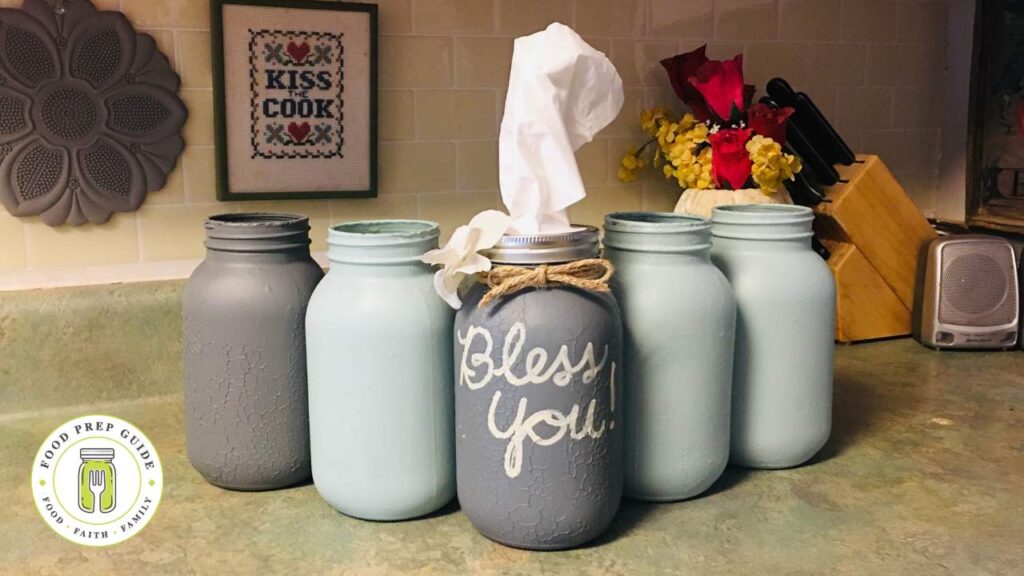
Last year, our family created mason jar tissue holders, and I absolutely love how they turned out.
Why Mason Jar Crafts Make Sense for Busy Families
Let’s be honest, homemade gifts are special, but they have to be practical too.
Nobody wants to create something that ends up collecting dust or worse—in the trash. That’s why I love this project.
These tissue holders:
- Use mason jars you probably already have (especially if you’re into canning!)
- Double as home decor while serving a practical purpose
- Cost just a few dollars to make
- Can be customized to match any decor style
- Make thoughtful gifts for teachers, neighbors, friends, or family members
Materials You’ll Need
Here’s what you’ll need to gather:
- Mason jar with ring (no lid needed)
- Spray paint or chalk paint in your color choice
- Paint marker in a complementary color
- Thick card stock or cardboard
- Box of tissues
- Scissors
- X-Acto knife
- Burlap twine (optional)
- Fake flowers (optional)
I chose a gray and teal color scheme, but you can customize these to match any home decor or even do seasonal colors (red and green for Christmas, pastels for spring, etc.).

Step-by-Step Instructions
Step 1: Prep and Paint Your Jars
First, make sure your jars are clean, dust-free, and lint-free. Any particles will show up in the paint and affect your finished product.
Spray paint your jars in a well-ventilated area. I recommend doing thin, even coats rather than one thick coat to prevent dripping.

Prices pulled from the Amazon Product Advertising API on:
Product prices and availability are accurate as of the date/time indicated and are subject to change. Any price and availability information displayed on [relevant Amazon Site(s), as applicable] at the time of purchase will apply to the purchase of this product.
Pro Tip: If you want a smooth finish, let them dry indoors at room temperature. If you prefer a textured look (which can add beautiful character!), let them dry outside on a cold day. I accidentally discovered this when some of my jars dried in our freezing garage, creating a lovely textured finish that looked intentional.
Step 2: Add Your Message
Once the paint is completely dry, use your paint marker to write “Bless You” on the front of the jar. This adds a thoughtful touch since it’s what we say when someone sneezes!
If you’re not confident in your handwriting, lightly sketch the words with pencil first, then trace over with the paint marker. Don’t worry if it’s not perfect—that’s what makes handmade gifts special.

Prices pulled from the Amazon Product Advertising API on:
Product prices and availability are accurate as of the date/time indicated and are subject to change. Any price and availability information displayed on [relevant Amazon Site(s), as applicable] at the time of purchase will apply to the purchase of this product.
Step 3: Create the Tissue Opening
Trace the mason jar ring onto your card stock, then cut out the circle.
Using an X-Acto knife, cut an X in the center of your circle. This will be where the tissues pull through.
Gently push up the four corners of your X to make it easier for tissues to come through.
Step 4: Add Decorative Elements (Optional)
For extra charm, you can add a simple twine bow and small flowers:
- Cut a piece of burlap twine about 2 feet long
- Wrap it around the jar just below the “Bless You” message
- Tuck small flowers or greenery under the twine before tying
- Tie a simple bow at the center front

Prices pulled from the Amazon Product Advertising API on:
Product prices and availability are accurate as of the date/time indicated and are subject to change. Any price and availability information displayed on [relevant Amazon Site(s), as applicable] at the time of purchase will apply to the purchase of this product.
Step 5: Prepare Your Tissues
This step is important to get right:
- Open your tissue box and remove about half the tissues
- Fold the stack in half with the top tissue facing up and out
- Fold again, keeping that top tissue accessible
- Stuff the folded tissues into your jar
- Thread the first tissue through your cardstock X
- Place the ring over the cardstock and screw it onto the jar
Variations to Try
- Use different colors to match your home decor or the recipient’s preferences
- Add seasonal elements like mini ornaments for Christmas or small seashells for a beach-themed bathroom
- Use colored tissues to peek through the top for a coordinated look
Gift Presentation Ideas
These make wonderful standalone gifts, but you can also include them as part of a gift basket. Some ideas:
- Add to a “Get Well Soon” basket with tea and honey
- Pair with hand sanitizer and lotion for a “Winter Wellness” theme
- Include in a bathroom refresh basket with hand towels and soap
Creating something handmade doesn’t have to be complicated or time-consuming. These mason jar tissue holders are proof that thoughtful, practical, and beautiful gifts can come from simple materials and a little creativity.
They’ve been a hit with everyone who’s received them, and I love seeing them proudly displayed in friends’ and family members’ homes rather than tucked away in a closet.
Just being real here – sometimes the simplest projects bring the most joy, both in making and giving them. And isn’t that what gift-giving should be about?
If you make these, I’d love to see how yours turn out!
And remember, the reason for the season is celebrating the birth of Jesus Christ, who came to save us from our sins. May your handmade gifts be a small reflection of the greatest gift ever given.