


If you’ve been wanting to get a head start on freezer meal prep—or just cut down on store-bought bread—this is a great place to start.
Today, we’re baking soft, fluffy sandwich bread using the bread machine, and we’re showing you two different ways to do it:
- Method 1: Let the bread machine do it all—from kneading to baking. Push a button and walk away.
- Method 2: Use the machine to knead and rise the dough, then shape it and bake it in the oven using a Pullman loaf pan for that perfect sandwich bread shape.
It’s the same recipe for both. The method you choose just depends on how you want your loaf to look—and how much hands-on time you have.
Why Make Sandwich Bread at Home?
Besides the obvious—saving money—it just tastes better. Plus, it freezes beautifully, and this method makes it possible to bake four loaves in one day while still being productive in other areas.
Homemade bread also means no weird preservatives or ingredients you can’t pronounce. Just real, honest food.

Ingredients for a 3-lb Loaf
This is scaled for a large bread machine. If your machine only makes 1.5 or 2 lb loaves, you’ll want to reduce the ingredients by about a third.
- 2 cups warm water
- 5 tablespoons butter (cold is fine, even from the freezer)
- 3 teaspoons salt
- 6 cups all-purpose or bread flour (we only stock all-purpose and it works great!)
- 5 tablespoons sugar (or ¼ cup honey)
- 2½ teaspoons active dry yeast

Prices pulled from the Amazon Product Advertising API on:
Product prices and availability are accurate as of the date/time indicated and are subject to change. Any price and availability information displayed on [relevant Amazon Site(s), as applicable] at the time of purchase will apply to the purchase of this product.
Bread Machine Instructions (Full Cycle)
If you want to keep it simple, this method lets your machine do everything from start to finish.
Steps:
- Add liquids first – water, then butter.
- Add dry ingredients – salt, flour, sugar.
- Make a small well in the center of the flour and pour in your yeast.
- Set your bread machine to the Basic or White Bread setting, dark crust, 3 lb loaf.
- Press start and walk away! It’ll take about 3 hours and 15 minutes from start to finish.
✔️ Pro tip: You can open the lid during kneading to peek inside—it won’t mess it up!
Bread Machine + Oven Instructions
(Pullman-Pan Method)
This version lets the bread machine do the work of kneading and rising, but you bake it in the oven for a classic rectangular sandwich loaf.
It’s our personal favorite for garlic bread or sliced sandwiches.
Step 1: Prepare the Dough
Use the same recipe above, but instead of running the full bake cycle:
- Set the machine to the Dough setting.
- This cycle usually takes about 1 hour and 15 minutes.
Step 2: Shape the Dough
- Butter your Pullman loaf pan generously.
- Lightly flour your work surface and shape the dough into a long rectangle.
- Place it in the pan and press it gently to fill the corners.

Prices pulled from the Amazon Product Advertising API on:
Product prices and availability are accurate as of the date/time indicated and are subject to change. Any price and availability information displayed on [relevant Amazon Site(s), as applicable] at the time of purchase will apply to the purchase of this product.
Step 3: Final Rise
- Cover and place in a warm spot – like in the oven with the oven light on (no heat) to rise for about 1 hour, or until doubled in size.
Step 4: Bake
- Preheat your oven to 350°F.
- Slide the lid onto your Pullman pan.
- Bake for 30 minutes, then check the internal temperature.
- Bread is done when it reaches 190°F in the center. Ours needed an extra 10 minutes, so total time was about 40 minutes.
Side-by-Side Results
| Method | Shape | Texture | Notes |
|---|---|---|---|
| Bread Machine | Tall, rounded loaf | Slightly firmer crust | Great for everyday toast & sandwiches |
| Oven-Baked (Pullman) | Classic rectangle | Ultra soft inside | Perfect for garlic bread, slicing, and freezer storage |
Both loaves turned out beautifully using the exact same recipe. The only difference was the method.
If you love that traditional store-bought shape (without all the junk), the Pullman pan method is worth the tiny bit of extra effort. And if you’re in a pinch for time—let the bread machine do it all for you.
Making your own sandwich bread doesn’t have to be fussy, and with the bread machine, it’s actually really simple!
Print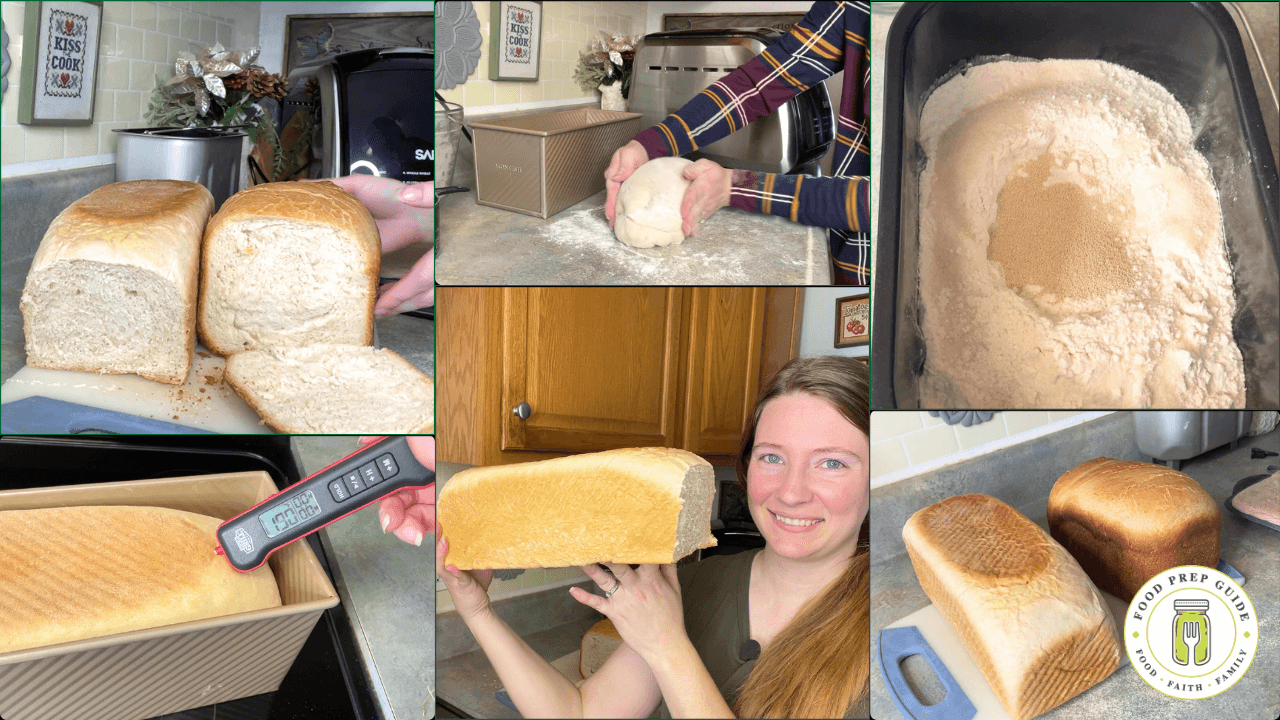
Bread Machine Sandwich Bread: TWO Ways!
This classic sandwich bread recipe produces a perfectly soft and fluffy loaf with a tender crumb. Versatile enough for sandwiches, toast, or to transform into delicious garlic bread, this recipe can be made entirely in a bread machine or shaped and baked in a Pullman loaf pan for that classic rectangular store-bought look.
- Yield: 3-lb loaf 1x
Ingredients
- 2 cups water
- 5 tablespoons butter, cut into chunks
- 3 teaspoons salt
- 6 cups all-purpose flour (or bread flour)
- 5 tablespoons sugar (or 1/4 cup honey)
- 2 1/2 teaspoons yeast
Instructions
Method 1: Bread Machine (Start to Finish)
- Add ingredients to bread machine pan in this order: water, butter, salt, flour, sugar, and yeast (make a small well in the flour for the yeast).
- Select the basic bread setting (setting #1).
- Choose crust color preference (medium or dark recommended).
- Select the 3 lb (or 1500g) loaf size.
- Press start and allow approximately 3 hours 15 minutes for complete cycle.
- When done, remove bread from pan and allow to cool.
Method 2: Bread Machine Dough + Oven Baking
- Add ingredients to bread machine pan in the same order as above.
- Select the dough cycle (setting #6).
- When cycle completes (approximately 1 hour 15 minutes), remove dough onto a lightly floured surface.
- Shape dough into a rectangle to fit a greased Pullman loaf pan.
- Place in pan and let rise in a warm place (oven with light on works well) for about 1 hour or until nearly doubled in size.
- Optional: Place Pullman pan lid on for a perfectly rectangular loaf.
- Preheat oven to 350°F.
- Bake for approximately 30-40 minutes, or until internal temperature reaches 190°F.
- Remove from oven, take off lid if using, and allow to cool.
Notes
For softer crust, rub the outside of the warm loaf with butter after baking.


I don’t own a bread machine. Can I use this recipe using my stand mixer to knead the dough then let it rise in a bowl on the first rise?
Yes! 🙂