If you’ve ever felt overwhelmed by the idea of starting seeds, you are not alone.
But … garden centers make bank when you feel that way.
They make way more money selling you $5 seedlings than they do a $2 packet of seeds that could grow dozens of plants. And, let’s be honest, no one buys just one seedling.
That’s why the seed-starting aisle can feel a little intimidating—with its expensive trays, specialty lights, heat mats, and endless products.
Thankfully, starting seeds is easier than it seems. You can absolutely do this with everyday items in your kitchen—and we’re going to show you how.
Whether you have an indoor setup or want to try our favorite frugal method, this post walks you through everything you need to know to grow strong, healthy seedlings—without the overwhelm.
Let’s get started!

Step 1: Test Your Old Seeds—No Fancy Gear Required
If you have packets of seeds from years past and aren’t sure if they’ll sprout, try this quick and easy germination test:
What you need:
- Paper towel
- Ziplock bag
- Your breath (yep—keep reading!)
How to do it:
- Dampen the paper towel (not soaking—just damp).
- Place seeds in a single layer on one half, then fold it over.
- Slide it into a labeled ziplock bag.
- Blow into the bag (adds a boost of carbon dioxide), then seal it up.
- Set it somewhere warm (top of the fridge or a sunny window works great).
In 3–5 days, you’ll know exactly which seeds are still viable—no wasted soil or guesswork. You can even plant them directly in the ground once sprouted!
Step 2: Try Winter Sowing (No Greenhouse Needed)
We love this method because it’s almost free, requires zero indoor space, and turns old milk jugs into mini greenhouses.
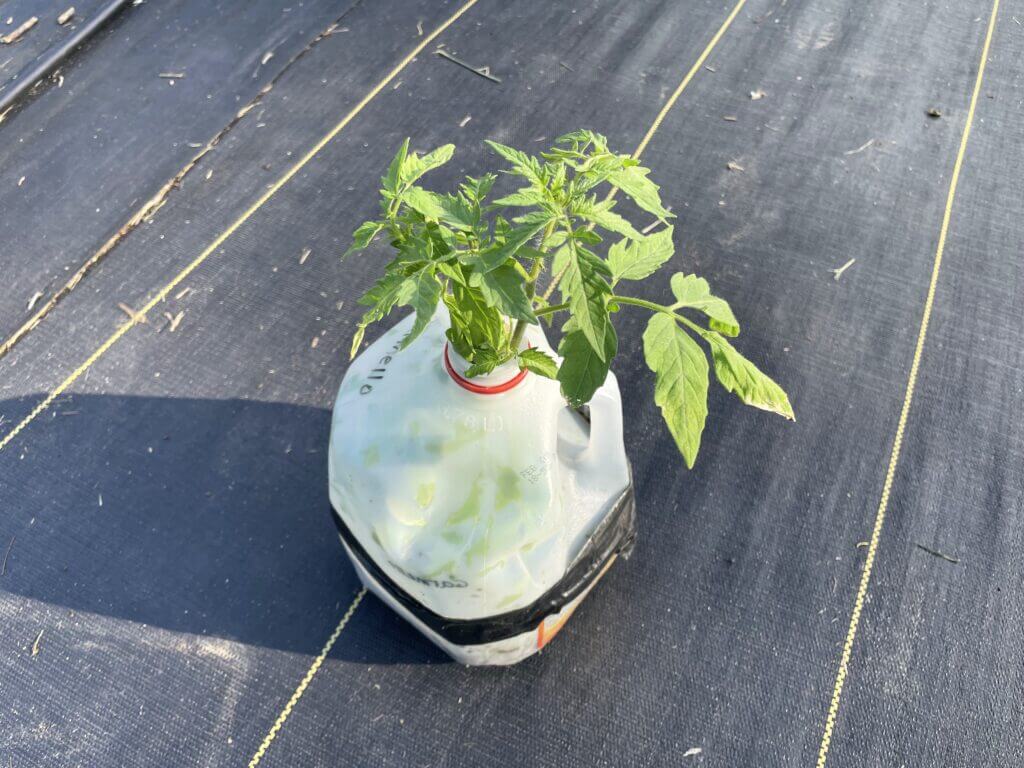
How to Winter Sow:
- Grab a milk jug (or clear plastic container like a rotisserie chicken tray).
- Cut drainage holes in the bottom and a slit around the middle to open it like a clamshell.
- Fill with potting mix (not seed-starting mix—it doesn’t have enough nutrients).
- Plant your seeds and tape the jug shut.
- Set them outside—even in the middle of winter.
Why it works:
- The jug traps heat and moisture like a greenhouse.
- Natural temperature swings signal seeds when it’s time to wake up.
- Rain and snow keep the soil watered—minimal effort required!
Just check for condensation. No condensation = time to gently water.
Once your seedlings sprout and reach a couple inches tall, they can handle freezing nights. If temps drop below freezing, toss a blanket or sheet over them. And once nights stay above 50°F? They’re ready to plant—with no hardening off needed.
Step 3: Start Indoors—Frugally
If you prefer to start seeds inside, you can still skip the pricey gear.
Our under-$50 seed-starting setup:
- Solo cups with drainage holes
- A heat mat (we just use a regular one for sore muscles!)
- A basic LED shop light (ours was $30 at Walmart)
For most plants, that’s all you need. Tomatoes and peppers benefit from a little warmth, but many other crops sprout just fine at room temp.
💡 Pro tip: Skip seed-starting mix and go straight to potting soil. It’s nutrient-rich and eliminates the need for “up-potting” your seedlings multiple times.
Dream of Filling Your Pantry with Homegrown Staples?
Plan your garden with our FREE PRINTABLE—Staples Garden: What to Plant to Feed Your Family for a Year!
Step 4: Avoid the #1 Mistake: Overwatering
The biggest cause of failure in seed starting is too much water. Overwatering creates the perfect environment for a fungal disease called damping off—which kills baby seedlings almost overnight.
What to watch for:
- Soil should feel like a wrung-out sponge, not wet and squishy.
- If the soil looks light-colored or dry to the touch, water.
- If it’s dark and moist—leave it be.
Once a seedling flops over from damping off, it’s too late to save it. So be gentle with the water and trust that less is more.
Bonus: Transplanting Tips + Microbial Magic
When it’s time to move your seedlings outside, we recommend using mycorrhizal fungi. This soil amendment helps your plants absorb more nutrients and grow stronger roots. It’s been a game-changer in our garden.

Prices pulled from the Amazon Product Advertising API on:
Product prices and availability are accurate as of the date/time indicated and are subject to change. Any price and availability information displayed on [relevant Amazon Site(s), as applicable] at the time of purchase will apply to the purchase of this product.
And whether you’re transplanting from a milk jug or Solo cup, don’t stress. These little seedlings are tougher than they look. You can pull out clumps, gently separate them with your fingers, and get 5–6 healthy plants from one jug.
What to Start from Seed (and What to Direct Sow)
Best for seed starting:
- Tomatoes
- Peppers
- Broccoli & cabbage
- Lettuce, spinach, mustard greens
- Herbs (culinary & medicinal)
- Flowers of all kinds
Best for direct sowing:
- Root crops (carrots, beets, radishes)
- Squash, cantaloupe, cucumbers
- Beans and peas (they don’t like their roots disturbed)
Seed starting doesn’t have to be complicated, expensive, or intimidating.
Once you get the hang of it, you’ll wonder why you ever paid $5 for a single tomato seedling when you could grow 30 plants from one $3 seed packet
And beyond saving money, seed starting gives you freedom. You choose what to grow, how it’s grown, and what goes into your family’s food!