

The two aspects of gardening that will make or break your success are soil and sun.
The sun aspect is simple enough to address. The majority of crops that lend themselves well to food preservation need 8+ hours of sun.
Therefore, it’s best to locate your garden in the sunniest spot on your property with your beds, rows, or containers positioned north to south.
Soil, on the other hand, is where it gets a little more complicated. In fact, soil is where I felt “stuck” for years.
I feel like I tried it all (and lost a lot of time). Now, I have a system that I’m confident will shorten and reduce your learning curve if you implement it.
It is a system that utilizes the no-till gardening method.
The No-Till Gardening Principle
For many people, gardening means tilling up the ground with some sort of machine. It’s a fine practice short term, but it’s not sustainable long term as it depletes the soil of its microbiome and nutrients in the long run.
Ultimately, I want to create a garden in my native backyard soil that—eventually—doesn’t require purchasing soil, fertilizer, amendments, and more. The only way to do that is to build your soil up over time instead of ripping it up each year with a tiller.
To build soil, you need to layer organic materials—one on top of another—year after year.
This is called the “No-Till Method” of gardening. Within this umbrella term, there are several variations:
- Lasagna Gardening
- Back to Eden
- Ruth Stout Gardening
- Deep Mulch
You will see these method names on the Internet but, essentially, they all refer to the same principle of building up your soil with organic matter.
What is considered organic matter? Materials such as:
- Animal manure (Important Note: Only rabbit and goat manure can be used “fresh.” Cow, horse, and poultry manure must be “aged” for at least 6 months before using in your garden. This is due to its high-nitrogen content, which can burn plants.)
- Leaves
- Hay
- Straw
- Kitchen scraps
- Compost
- Grass clippings
- Wood chips
How to Start a No-Till Garden
Pick a spot on your property that receives the most sun. If the grass is tall, mow it down.
Next, place cardboard over the area you want to turn into fertile soil. Be sure to overlap the cardboard pieces. You don’t want any gaps for weeds to poke through. Double-layering is best. Avoid colored or inked cardboard; opt for natural brown instead.
(Note: Weeds will still poke through over time, but you will eventually smother them with multiple layers, and they will become less and less of a problem.)
After the ground is sufficiently covered, soak the cardboard with a water hose. Alternatively, you can plan to lay out your cardboard before a heavy rain.
If you have kitchen waste (food scraps, egg shells, and such—no meat or dairy), you can lay it on top of the cardboard. No need to compost it first.
Next, add a layer—at least 6 inches deep—of equal parts soil and composted (aka aged) manure.
On top of your soil layer, add a thick, 4-6 inch layer of mulch. When I refer to mulch throughout this course, I don’t mean bags of tinted mulch like you can buy at the store. Opt instead for hay, straw, leaves, grass clippings, composted wood chips, or any mixture of them.
A word of caution about hay and wood chips:
Most store-bought hay is sprayed with herbicides. If you plan to use hay, you need to verify that it has not been sprayed with anything.
As for wood chips, it is very important that you only use old, composted wood chips—aka wood chips that have been sitting and breaking down for a year or more.
Wood chips fresh off the tree will rob nitrogen from your soil, and nitrogen is necessary for plant growth.
To plant, you will create a hole within the mulch layer, and plant the seed in the soil layer beneath.
Throughout the growing season, continue to add mulch whenever possible. If you see weeds, pull them, and cover with a thick patch of mulch.
At the end of your growing season, cover the entire area with cardboard. When spring rolls around next year, repeat the entire process. In doing so, you will create layers upon layers of organic matter that will only improve with time.
Realistic Expectations
As you may have already gathered, building up your soil takes time. However, by starting this year, you’re taking steps toward a low-cost, low-maintenance, sustainable garden system.
By sustainable I mean two things:
- You’re building soil that improves year after year because it is a desirable home for worms, fungi, and beneficial microbes. Therefore, it grows more fertile over time. Fertile soil = higher yields.
- Eventually, you will not be dependent on stores or outside sources to purchase fertilizer, soil, and amendments.
This is my fourth year since implementing the no-till method, and my production costs have decreased tremendously. Also, I’m able to maintain the garden with just a few hours of work per week.
But … it took four years to get to this point.
In the beginning, you will likely need to purchase soil, fertilizer, and amendments. Most people cannot simply place a seed in the ground and expect productive results.
A garden is an investment—but it is one that will pay dividends for decades to come.
7 Gardening Methods: Pros, Cons, and How To’s
In the videos below, I’ll review several different growing methods—containers, raised beds, vertical gardening, traditional rows, and more.
You should choose the best method(s) that work for you.
However, I know the benefit of having a plan to follow. If it would save you time and brain power to have someone “tell you what to do” in this regard, here is a plan with dimensions and supply list.
I designed this plan to fit even small backyards.*
However, if it doesn’t fit within your blueprint, adjust to your needs:
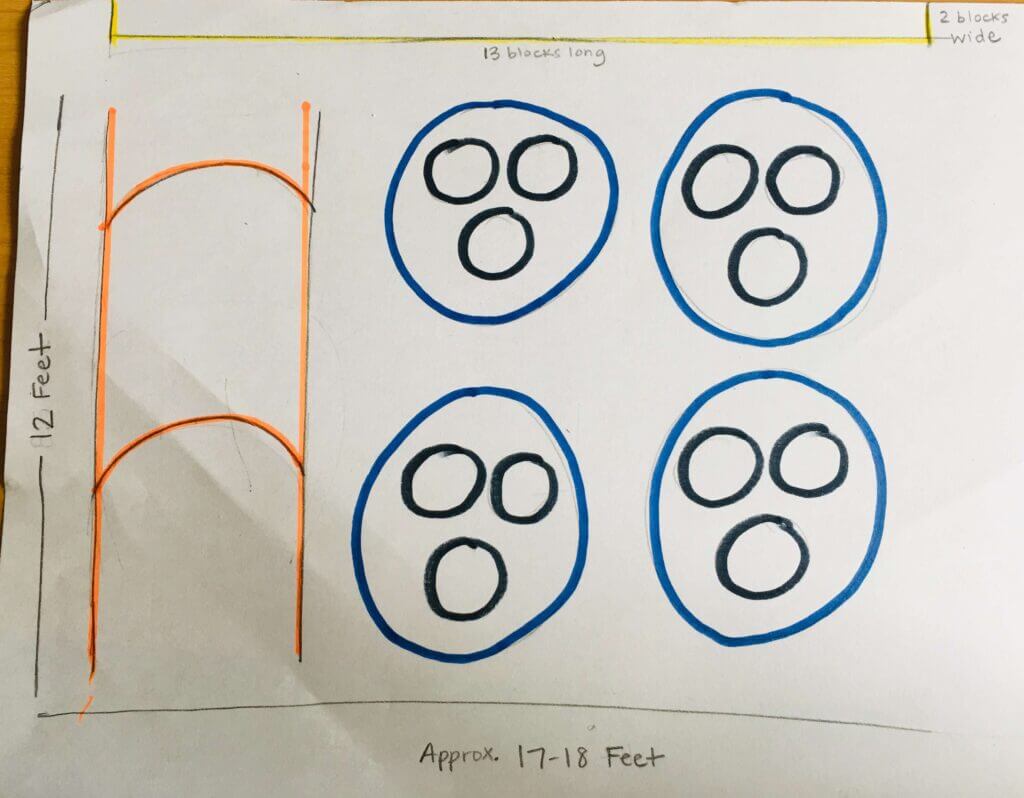
Color Code:
- Orange: Cattle-panel trellis tunnel
- Yellow: Concrete blocks (13 blocks long x 2 blocks wide)
- Blue: Kiddie pools
- Black: Fabric grow bags
Supplies:
- (2) 16-ft Cattle panels
- (8) 4-ft T-posts
- (4) Kiddie pools (the round, shallow, hard plastic variety)
- (12) Fabric grow bags
- (30) Concrete blocks (formerly known as cinder blocks)
- Cardboard, soil, and mulch materials
*If you have space for long rows (like our great grandparents had in their gardens), I recommend creating rows instead and adding cattle panel trellises to one of the rows.
1. Vertical Containers (Like the GreenStalk)
You can learn more about the GreenStalk here.
2. Vertical Trellis
How to Install a Cattle Panel Trellis
3. Raised Beds
How to Install a Concrete Block Raised Bed
4. Rows
5. Square Foot Gardening
6. Grow Bags
7. Tilling
Sources for Free Materials
Cardboard
Stores such as Dollar General often have racks of cardboard behind their buildings. Ask an employee if you can take as much cardboard as you need. He or she will likely be more than happy to let you.
Wood Chips
ChipDrop is a service that pairs landscape companies with people who want wood chips. Companies love the service because they don’t have to pay to dispose of their byproduct, and you get a free, abundant source of woodchips.
Alternatively, check with your local tree-trimming services. Lastly, ask your local energy company. Power companies must keep trees trimmed around power lines, and they have to pay to dispose of their wood chips. As with ChipDrop, they are happy to have somewhere free to dump.
Compost
Check your local landfill or county dump to see if there is a compost program. In an effort to be more eco-friendly, many such programs accept compostable material and then offer compost to the public for free.
Manure
Ask local farmers if they have an area where they dump their barn cleanout. Most farms have a tractor, and I’ve found that many are happy to use it to dump scoops of barn cleanout into a trailer or bed of a truck—no shoveling necessary.
Leaves and Grass Clippings
Besides your own yard, you can save yourself a lot of labor by picking up trash bags full of leaves and lawn clippings that people set at the curb during fall.